6. Desktops
Once you have installed PC-BSD®, you will want to become familiar with your desktop environment. This chapter provides an overview of the desktops which can be selected during the installation of PC-BSD® or installed afterwards using AppCafe®. Desktops, when installed, will appear in the list of available desktops when a user logs in.
Note
Fluxbox is always installed and available in the login menu of a PC-BSD® system.
For the desktops that support desktop icons, three PC-BSD® icons will appear on the desktop:
AppCafe®: graphical utility used to install, uninstall, and upgrade software. See the section on AppCafe® for more details.
PC-BSD® Control Panel: contains applications for administering the computer. See the section on Control Panel for more details.

PC-BSD® Handbook: the HTML version of the PC-BSD® 10.1.2 Users Handbook (this document).
Even more desktops are available for installation from AppCafe®. These can be browsed in the “X11 - Window Managers” category. Note that if the desktop is not described in this chapter, it will not automatically be added to the login menu.
6.1. Awesome
The awesome window manager is highly configurable and primarily targeted at power users who prefer to use the command line within their graphical environment.
Figure 6.1a shows a screenshot of Awesome running on PC-BSD® 10.1.2. The user has right-clicked the desktop in order to launch the awesome application manager.
Figure 6.1a: Awesome Window Manager on PC-BSD®
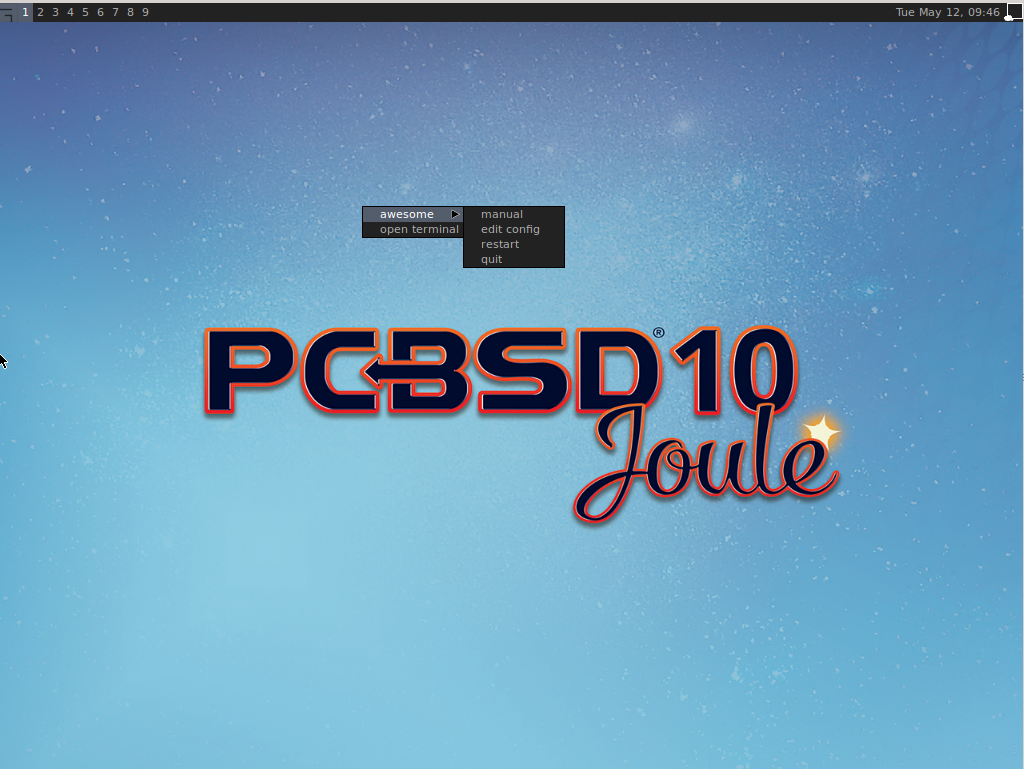
If you click awesome ‣ manual, the man page for awesome will open in a terminal. If you click awesome ‣ edit config, the awesome configuration file will open in the nano text editor. The numbers in the upper left corner represent virtual desktops. For example, you can have different terminals open in each virtual desktop.
If you wish to access Control Panel, open a terminal and type pc-controlpanel. To launch AppCafe®, type appcafe in a terminal. To exit this desktop and return to the login screen, use awesome ‣ quit.
6.2. Cinnamon
Note
Cinnamon requires 3D acceleration. If your video driver does not support this, you should not install Cinnamon.
The Cinnamon desktop environment is developed by the Linux Mint project. Figure 6.2a shows a screenshot of Cinnamon on a PC-BSD® 10.1.2 system with the applications “Menu” open.
Figure 6.2a: Cinnamon Desktop on a PC-BSD® System
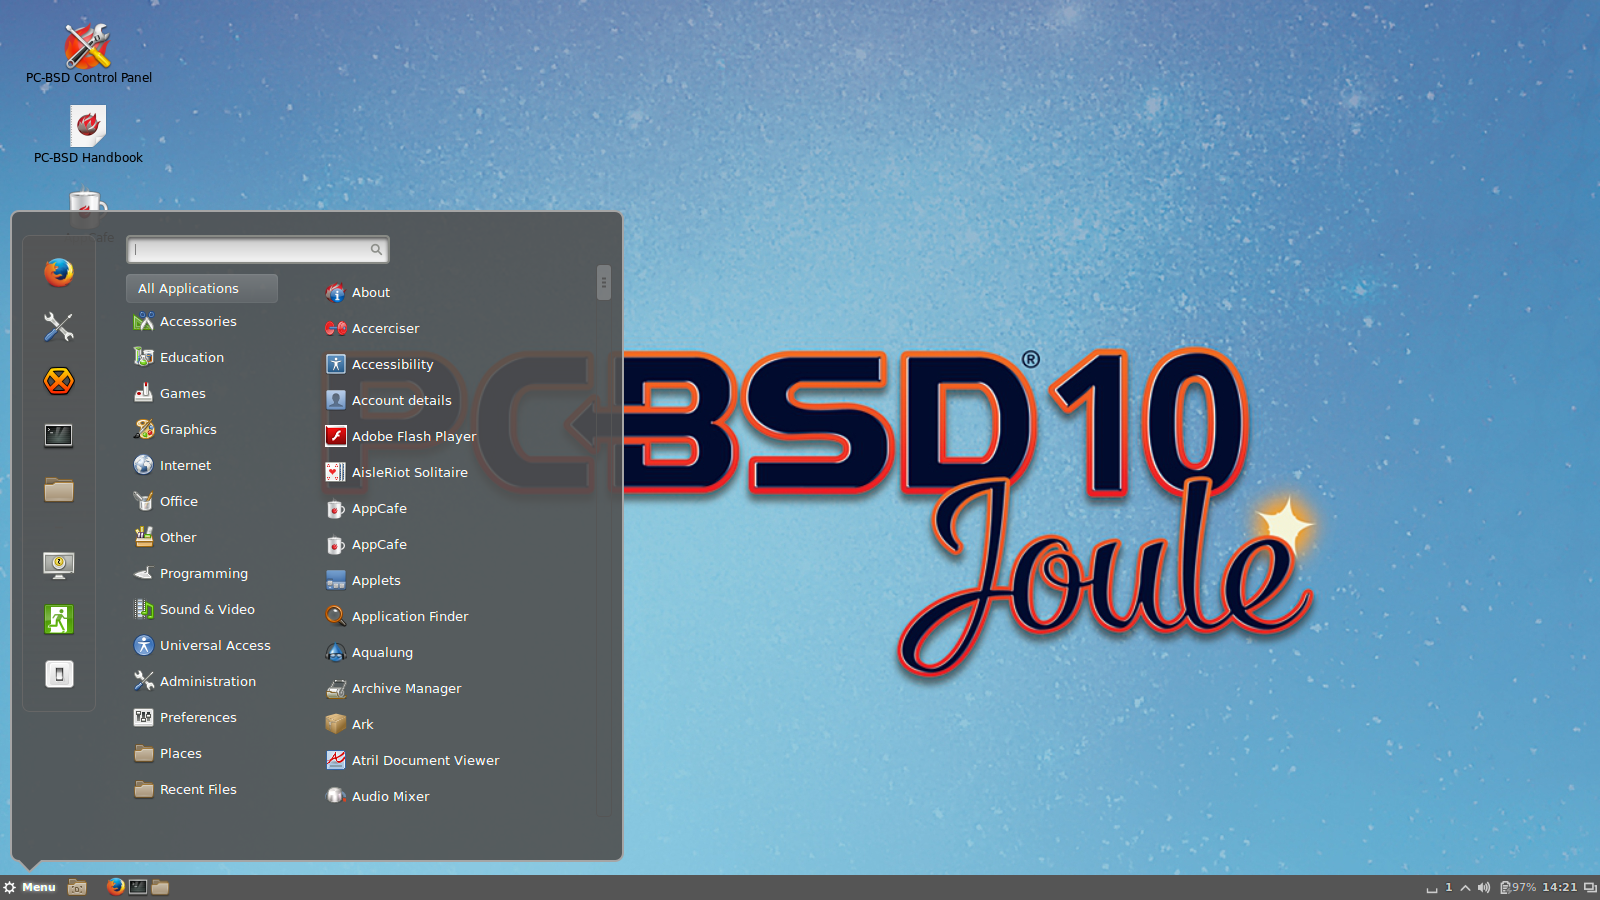
Hover over a category in the menu to see its available applications. Alternately, use the search bar to find a specific application.
Click the wrench icon in the upper left corner to access the “Cinnamon Settings” menu, where you can configure backgrounds, desktop effects, themes, applets, desklets, extensions, menu items, the screensaver, and so on. Additional themes, applets, desklets, and extensions can be downloaded from the Cinnamon website.
Additional tips can be found at the PC-BSD® Cinnamon Tips and Tricks page.
6.3. Fluxbox
The Fluxbox window manager is light-weight and fast. Regardless of the window managers that you have selected to install, Fluxbox is always available as an option in the login menu.
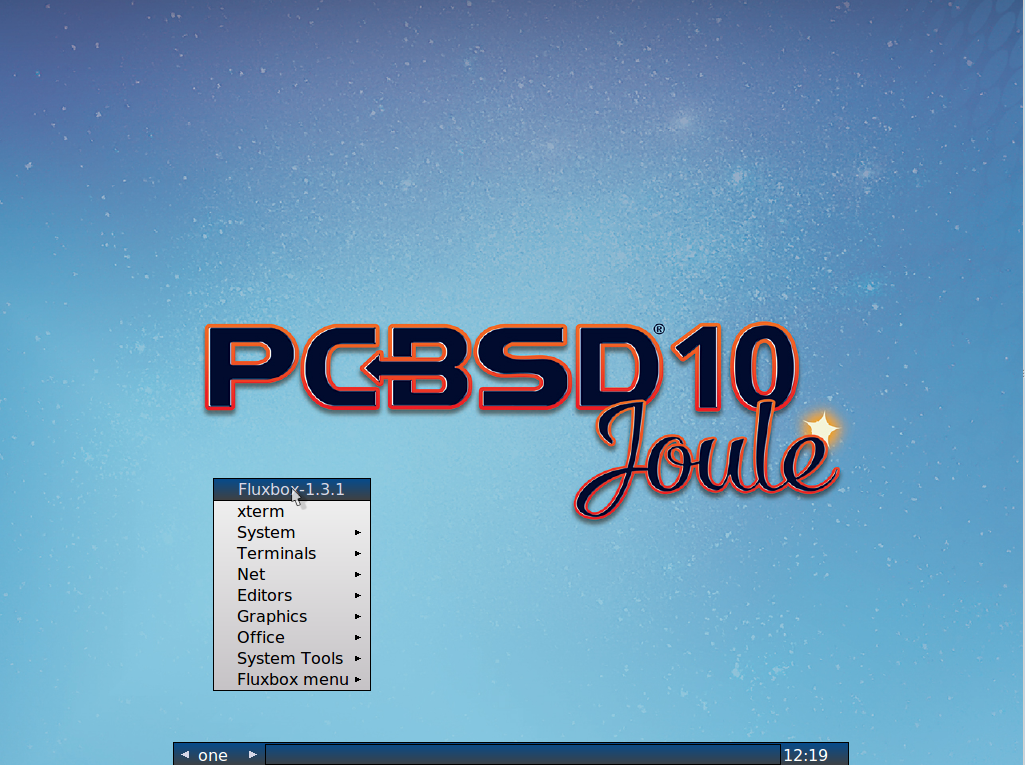
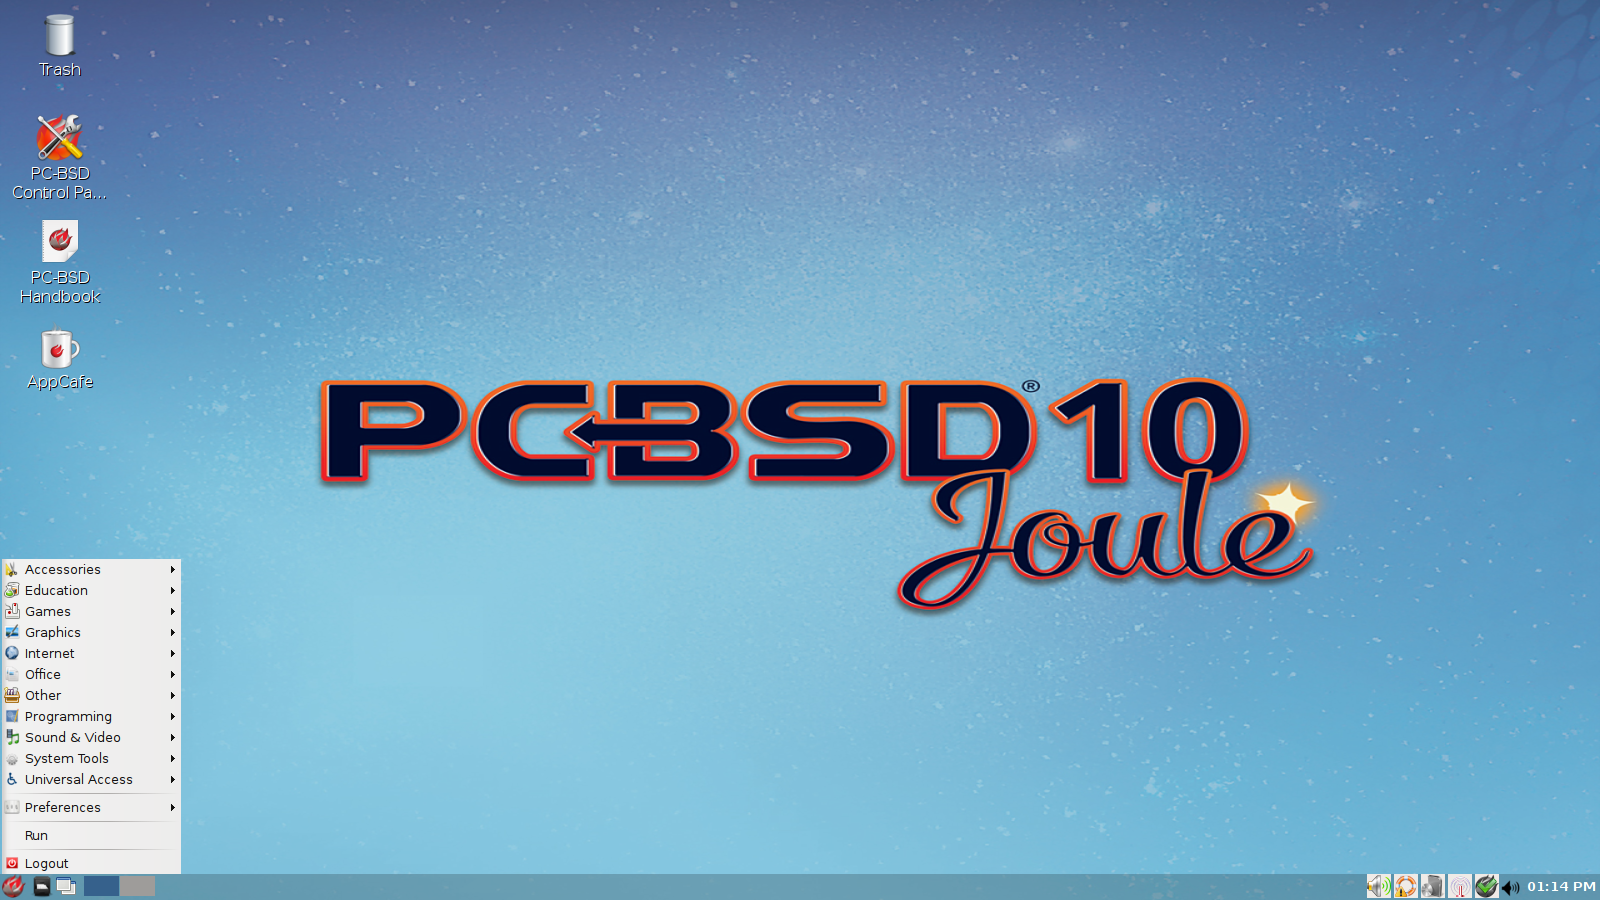
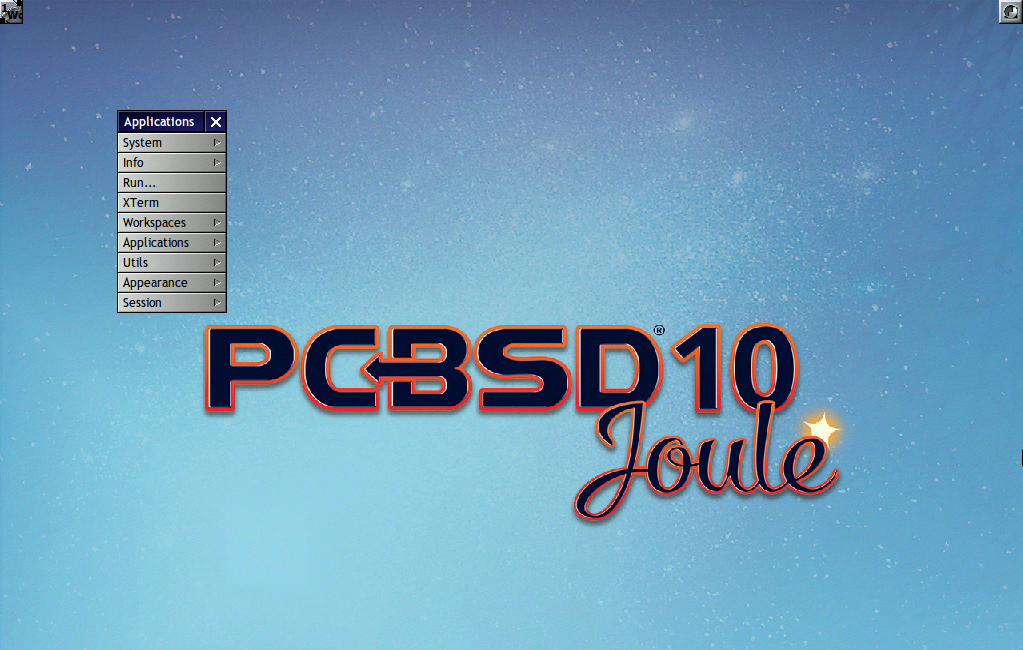
Figure 6.3a shows a screenshot of Fluxbox running on PC-BSD®. In this example, the user has launched the “Application” menu by right-clicking on the desktop.
Figure 6.3a: Fluxbox on PC-BSD®
Fluxbox provides many configuration files which can be edited in order to customize the desktop. The Features page of the Fluxbox website lists the available configuration files and links to instructions for getting the most out of Fluxbox.
The following resources are useful when customizing Fluxbox:
6.4. FVWM
The FVWM window manager is powerful and highly configurable. It supports any number of virtual desktops, each divided into multiple pages. It also supports side title bars, including vertical text.
When you install FVWM on PC-BSD®, it also installs FVWM-Crystal. Both window managers will be added to the login menu.
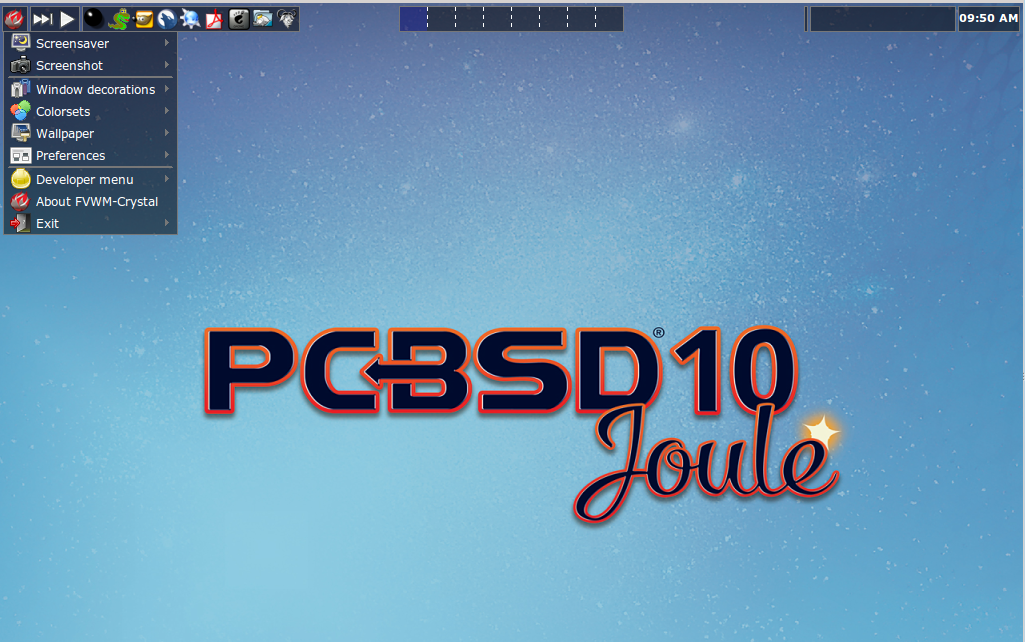
Figure 6.4a shows the default PC-BSD® desktop if you select FVWM from the login menu. The application menu was opened by clicking the mouse anywhere on the desktop.
Figure 6.4a: FVWM Running on PC-BSD®
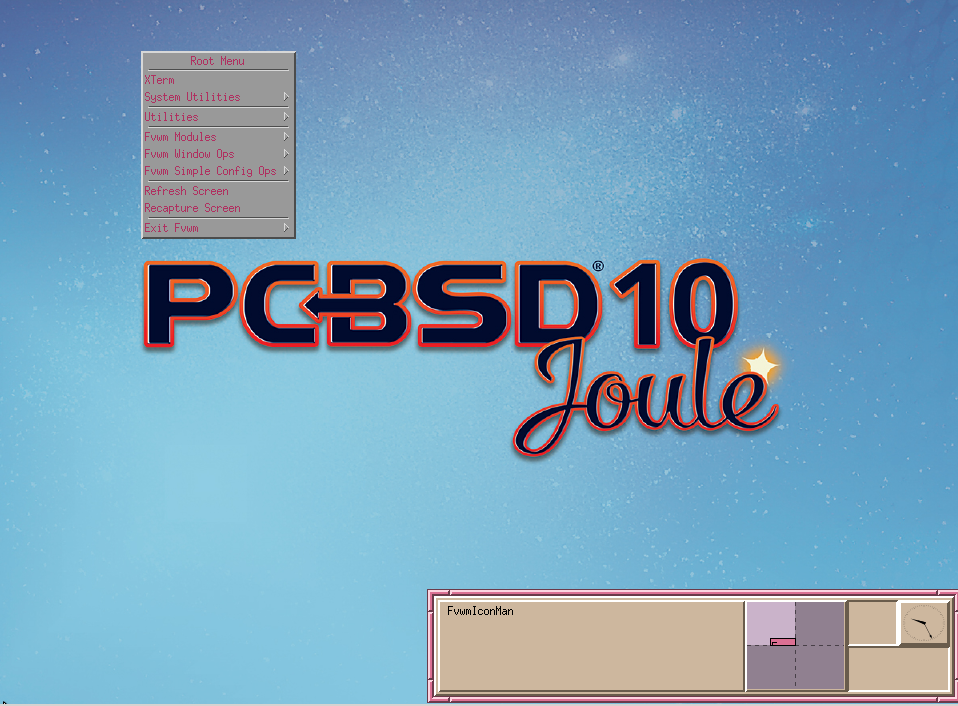
Figure 6.4b shows the default PC-BSD® desktop if you select FVWM-Crystal from the login menu. To open an xterm in FVWM-Crystal, right-click any area of the desktop.
Figure 6.4b: FVWM-Crystal Running on PC-BSD®
The FVWM Documentation provides information about configuring FVWM.
6.5. GNOME
When you install GNOME on PC-BSD®, it installs both GNOME2 and GNOME3. GNOME2 will appear in the login menu as “GNOME Classic” and GNOME3 will be listed in the login menu as “GNOME”.
Note
GNOME3 requires 3D acceleration. If your video driver does not support this, you should use GNOME2 instead.
GNOME3 is a popular desktop environment that provides many built-in utilities. Figure 6.5a shows a screenshot of GNOME3 on a PC-BSD® 10.1.2 system. To access the icons shown in this screen, click “Activities” then the 9-dot icon at the bottom of the left-hand panel. Alternately, if you know the name of an application to open, click “Activities” and type the application’s name into the search bar.
Figure 6.5a: GNOME3 Desktop on a PC-BSD® System
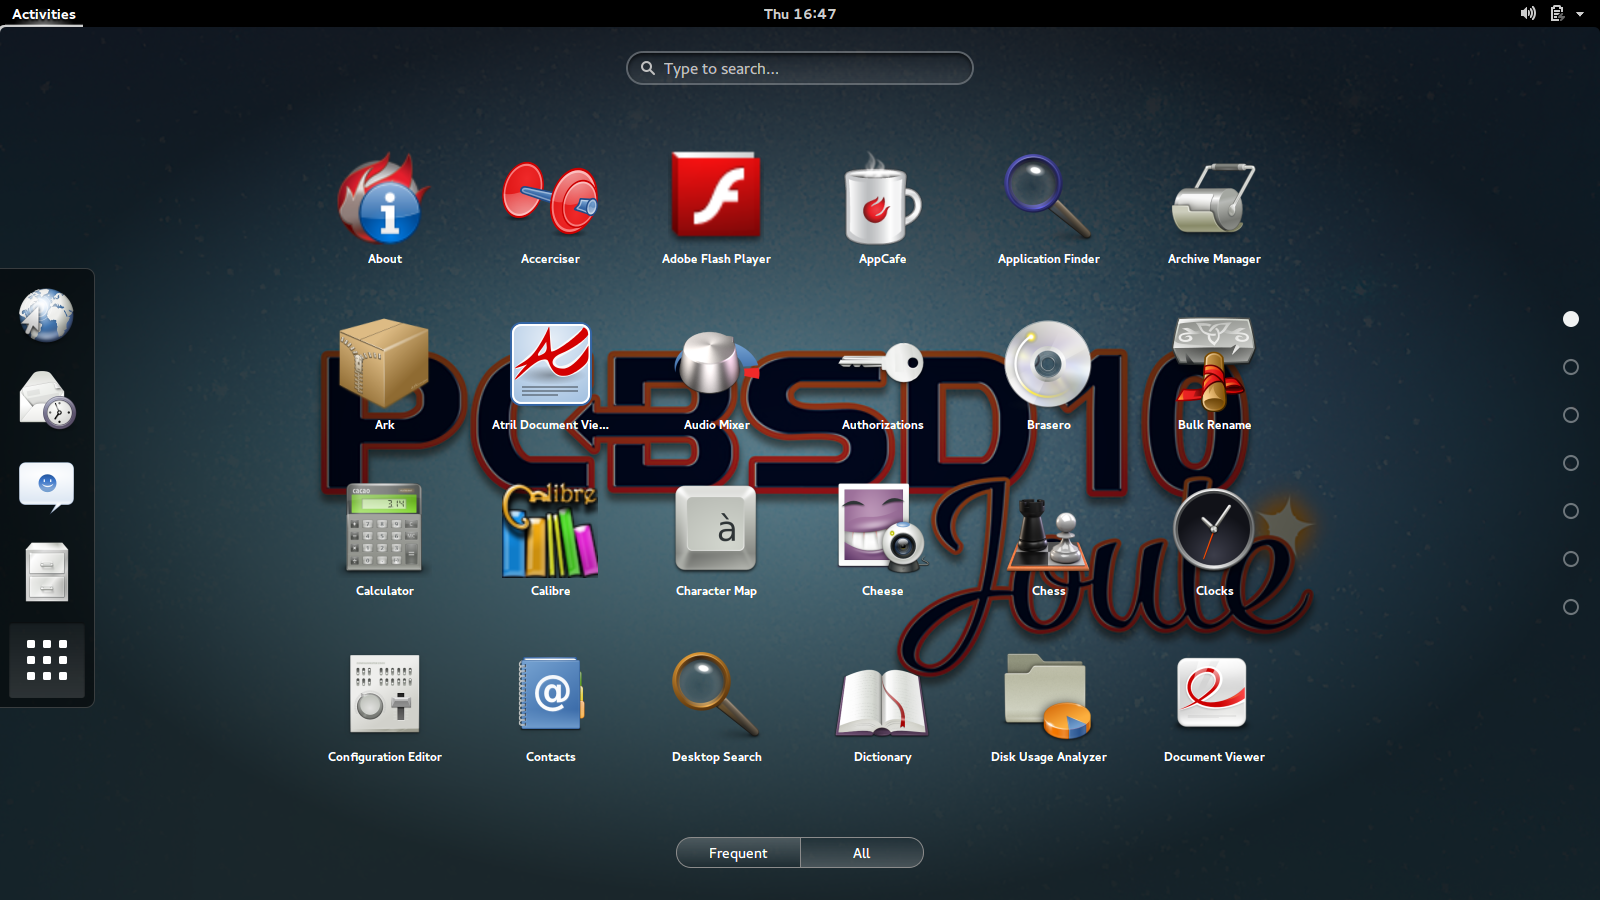
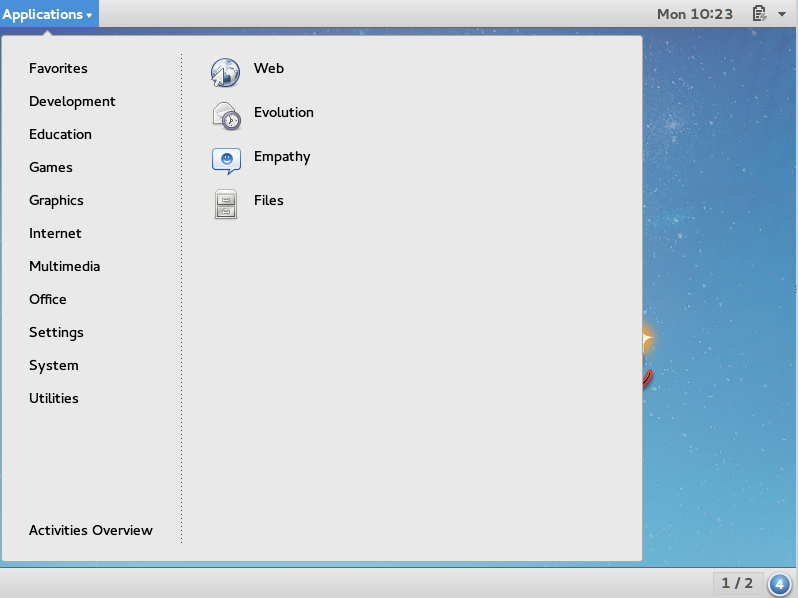
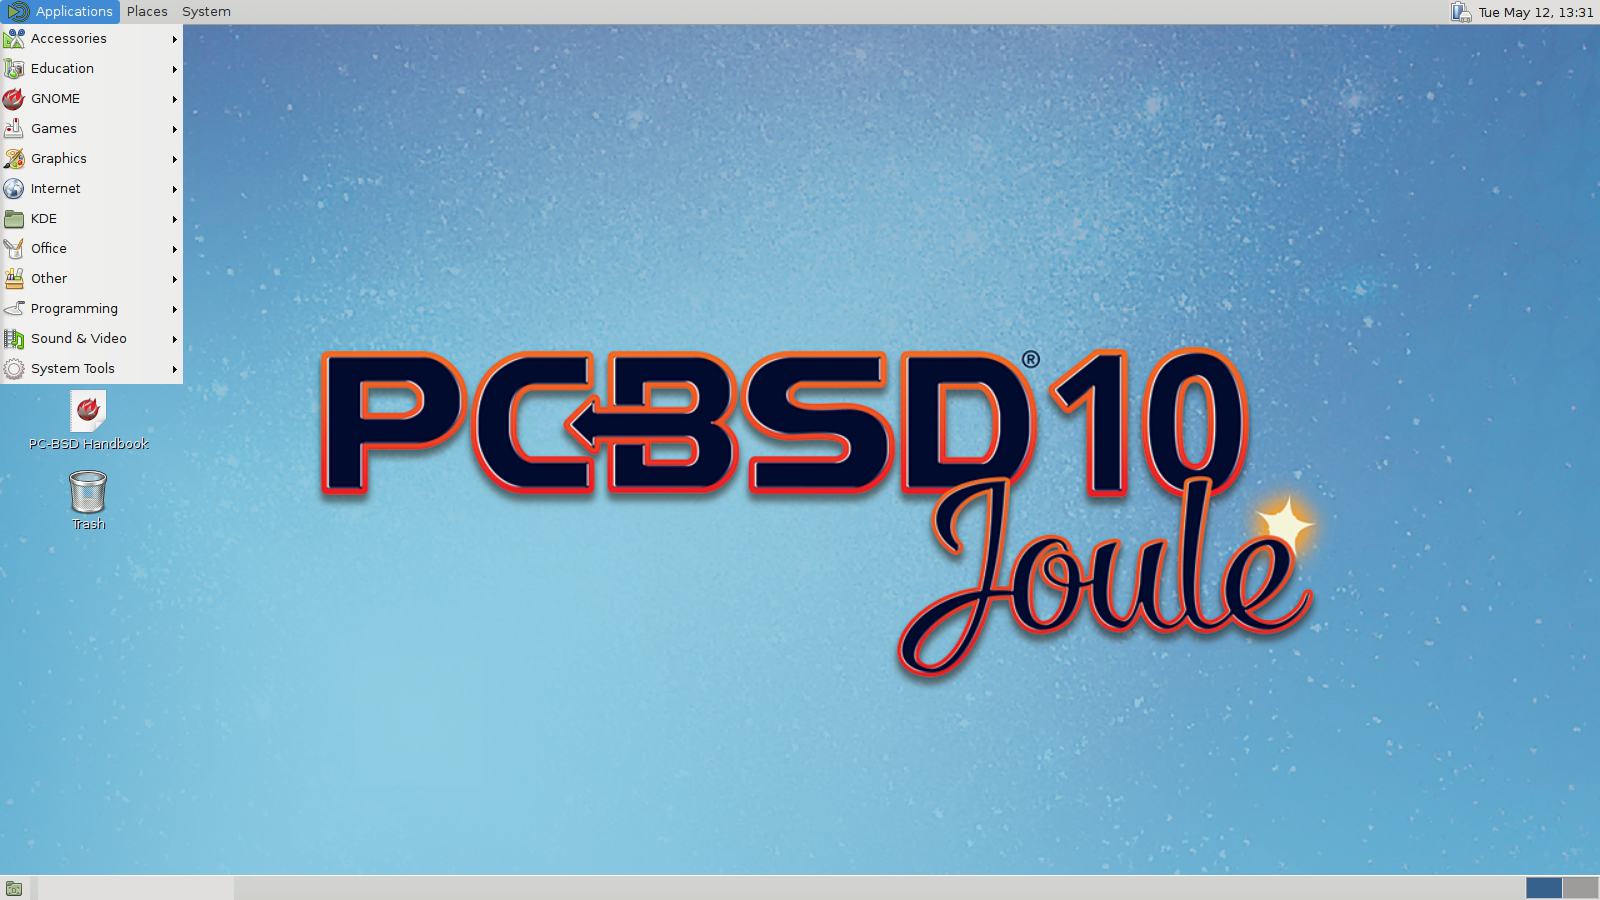
Figure 6.5b shows a screenshot of GNOME2 on a PC-BSD® 10.1.2 system with the “Applications” menu open.
Figure 6.5b: GNOME2 Desktop on a PC-BSD® System
If you are new to GNOME, take some time to discover which applications best suit your needs. Some of the applications which are provided by GNOME include:
- Image Viewer: Eye of GNOME image viewer.
- Web: web browser.
- Brasero: CD/DVD burning software.
- Videos: movie player.
- Evolution: email client with address book and calendar.
- Files: Nautilus file manager.
Note
some games, such as Lights Off, Quadrapassel, and Swell Foop, require 3D acceleration. If your video driver does not support this, you will not be able to launch those games.
You can find additional themes and wallpapers at gnome-look.org.
Additional tips can be found at the PC-BSD® GNOME Tips and Tricks page.
6.6. i3
The i3 tiling window manager is extremely lightweight and designed for users who prefer to work from the command line. Keyboard shortcuts are provided to open xterms in order to start applications from the command line.
Figure 6.6a shows a screenshot of i3 running on PC-BSD® 10.1.2.
Figure 6.6a: i3 Window Manager on PC-BSD®

To open an xterm, use Alt Enter. Windows do not provide minimize, maximize, or close buttons, so type exit when you are finished using an xterm. To leave the window manager and return to the login screen, type killall i3 from within an xterm.
The i3 Users Guide contains the default key bindings and instructions for customizing i3.
6.7. IceWM
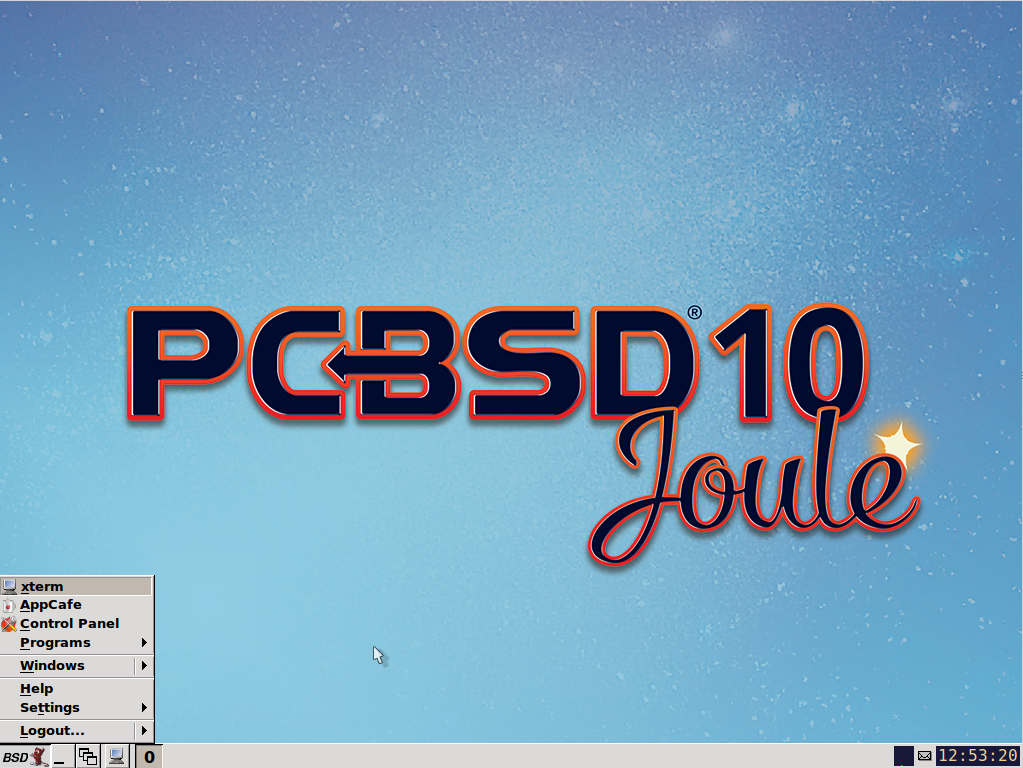
The IceWM window manager is light-weight. Figure 6.7a shows a screenshot of IceWM running on PC-BSD®. In this example, the user has launched the “Application” menu by clicking on the “BSD” button in the lower left corner. This menu can also be launched by right-clicking anywhere on the desktop.
Figure 6.7a: IceWM on PC-BSD®
If you are new to IceWM, refer to the IceWM FAQ and Howto for more information about configuration, customization, and keyboard shortcuts.
6.8. KDE4
The KDE desktop environment provides many features and applications. However, it is hardware intensive and may run slowly on a computer with an older processor or a small amount of RAM. Figure 6.8a shows a screenshot of KDE4 running on PC-BSD® 10.1.2 with the “Applications” menu open.
Figure 6.8a: Applications Menu of KDE4
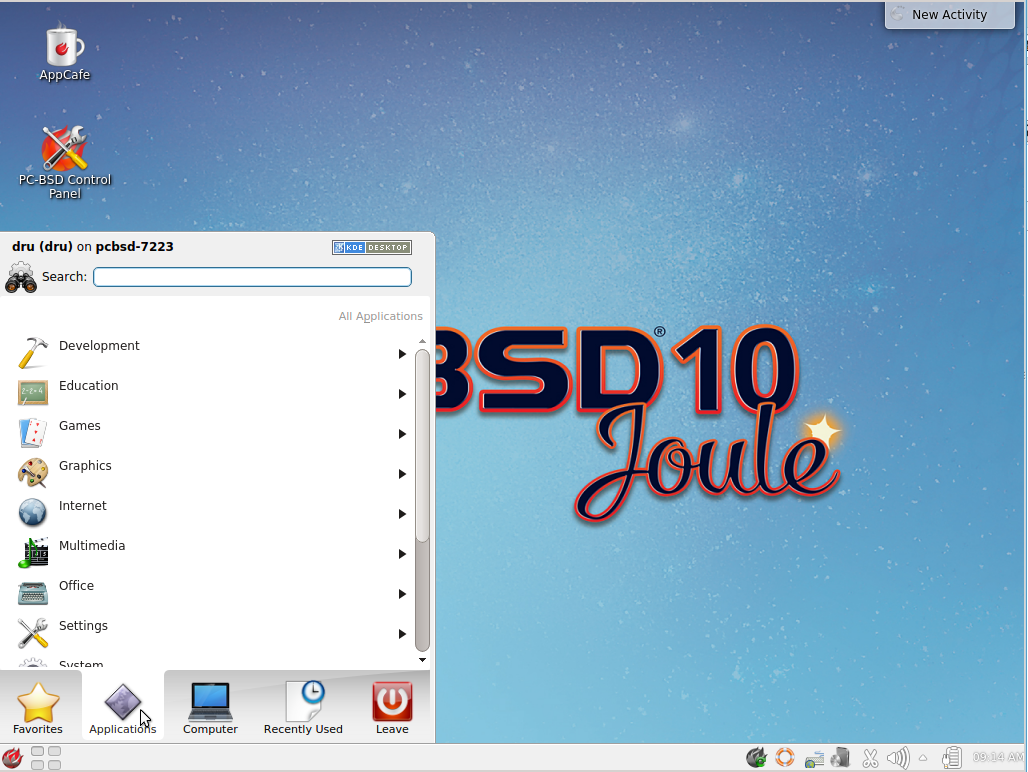
Each category in the “Applications” menu contains many applications and the “Settings” and “System” categories contain many utilities for configuring your system. If you are new to KDE4, take some time to discover which applications best suit your needs. Some of the applications which are provided by KDE4 include:
- Konqueror: file manager, web browser, and SSH client found in Internet ‣ Web Browser.
- Okular: document viewer and annotator found in Office ‣ Document Viewer. Supports PDF, OpenOffice, and Postscript files.
- Dolphin: file manager found in System ‣ File Manager. Dolphin provides many features for manipulating files such as comments, tags, search, encryption, and archival (zip/unzip) functions.
By default, desktop effects are disabled as not all video cards support them. If your video card supports 3D effects and you would like to enable them in KDE, go to System Settings ‣ Desktop Effects ‣ General and check the box “Enable desktop effects at startup”.
Some of KDE’s games require 3D support. If your video card does not support 3D, these games will fail to start.
If you have KDE installed and are currently logged into a different window manager, you can still run any KDE application by specifying its name. For example, type konqueror to run the Konqueror web browser or dolphin to access the Dolphin file manager.
KDE Applications includes descriptions and screenshots of all of KDE’s applications as well as links to their handbooks.
kde-look.org contains additional themes and wallpapers.
6.9. Lumina
The Lumina Desktop Environment (Lumina for short) is a lightweight, XDG-compliant, BSD-licensed desktop environment that focuses specifically on streamlining the ability to get work done while minimizing system overhead. It is specifically designed for PC-BSD® and FreeBSD, but has also been ported to many other BSD and Linux operating systems. It is based on the Qt graphical toolkit and the Fluxbox window manager, and uses a small number of X utilities for various tasks, such as numlockx and xscreensaver.
Lumina’s features include:
- Very little system overhead.
- Intelligent “favorites” system for creating quick shortcuts to applications, files, and directories.
- ZFS file restore functionality through the Insight File Manager.
- Desktop system is plugin-based, which is similar to Android or other modern operating systems.
- Simple access to operating system-specific functionality such as screen brightness, audio volume, and battery status.
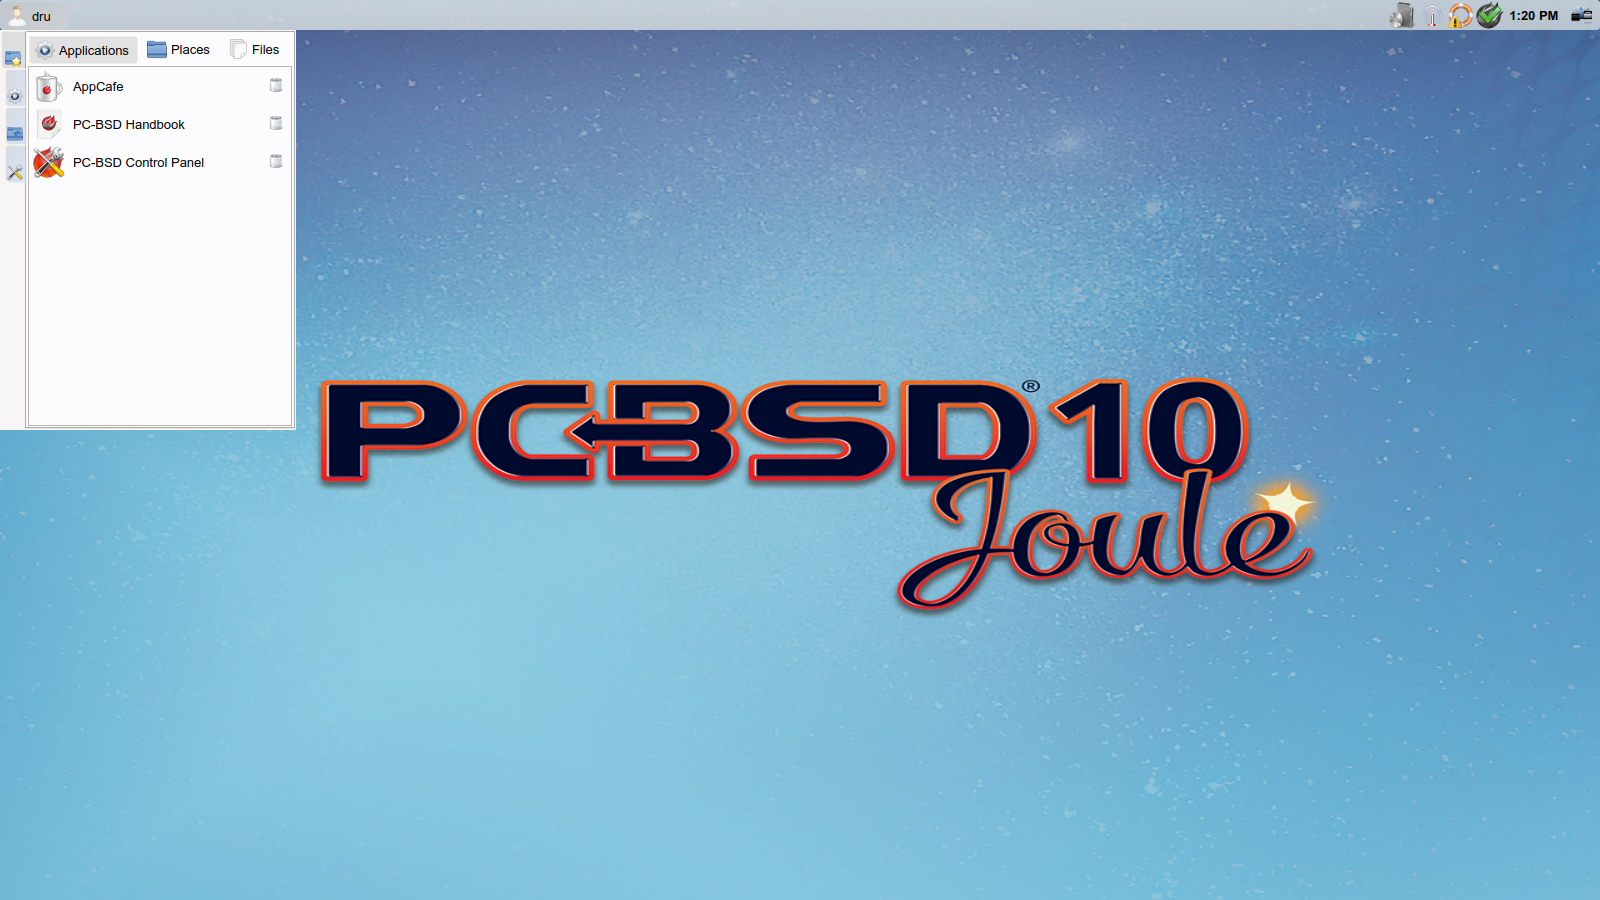
Figure 6.9a shows a screenshot of Lumina on a PC-BSD® 10.1.2 system with the “User” button clicked.
Figure 6.9a: Lumina Desktop
Note
while the PCDM login manager will automatically display Lumina in the desktop menu on a PC-BSD® system, users of other operating systems can add “Lumina-DE” as the name of the binary in their .startx, .xinitrc, or similar startup file.
The “User” button provides quick access for user interaction with the system. The left frame of this menu contains the following 4 tabs:
- Favorites: the yellow star icon allows the user to quickly launch anything that was setup as a “favorite”. Favorites can be applications, files, or directories, and are separated into those three categories. Favorites can be removed by clicking the small button on the right side of the entry. If the button icon is a red minus sign, removing the favorite does not actually delete the file as just its link is removed. If the button icon is a trash can, the file will actually get deleted permanently. Note that anything that exists in the users Desktop folder (~/Desktop) is automatically treated as a favorite.
- System Applications: the white and blue gear icon lets the user browse all the applications currently registered on the system. By default, applications are listed alphabetically, but the list can be narrowed down by category using the drop-down list at the top of the tab. If you are running PC-BSD® or another operating system that has a pre-defined application “store”, you will also have a shortcut at the top of the tab which will open up that application store. On a PC-BSD® system, the shortcut is to AppCafe®. Each application has a little “star” button on the right side of the entry. This allows you to mark an application as a favorite and have it appear on your personal list of quick shortcuts.
- Home Directory: the blue folder icon lets the user quickly browse through all the directories in their home and open any of them in the Insight file manager by clicking the “Browse” button. You also have the same little “star” on directories that can be clicked to mark that directory as a favorite if you want quick access to it later.
- Desktop Preferences: the yellow tool icon provides quick shortcuts to system and desktop configuration utilities. It also contains “About the Lumina Desktop” which can be clicked to determine the installed version of Lumina. You can also determine the version by typing lumina-info.
If you are on PC-BSD®, or a supported operating system, you should have links to the operating system’s control panel, the desktop configuration utility (lumina-config), qt-config (if it is installed), the screen configuration utility (lumina-xconfig), and the screensaver configuration utility.
Any open windows or applications will have a button appear in the section of the panel near the “User” button. If the application provides an icon, the button will appear as that icon and if you mouse over it, the tooltip will show the name of the application. If you have multiple copies of an application running, it will combine all those entries into a single button and list the number of windows after the icon. If you click on a button, it will automatically make that window active. If there are multiple windows, you can select the particular window you want from a drop-down menu. The color of the button will change depending on the state of the window: grey for a hidden or minimized window, white for a visible but inactive window, yellow for the active window, and orange for a window that needs attention.
The system tray is located in the right portion of the panel. Any applications that register a tray icon will appear in this area. Click an icon to interact with that application directly. The current system time shown by the clock is in the default format for the current locale.
6.9.1. System Dashboard
The “System Dashboard” button is located at the far right of the panel and shown in Figure 6.9b.
Figure 6.9b: System Dashboard Menu
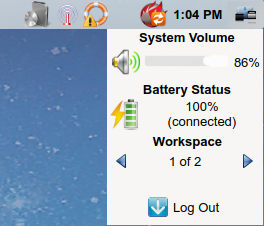
This button provides quick access to hardware-specific information or operations, as supported by your operating system. The possible menu entries are:
- A slider for changing the audio volume for the system from 0% to 100%. If the operating system provides a mixer utility, an icon will also appear. Click the icon to launch that mixer utility for advanced control of the audio system.
- The current status of the battery, if your system has one, and the estimated time remaining if that battery is discharging.
- A listing of the number of virtual workspaces that are in use, with arrows to switch between the different workspaces.
- The “Log Out” button for ending the desktop session. When the “Log Out” button is clicked, a window of choices will be displayed in the middle of the screen. The choices include: “Log Out”, “Restart” (if the user has permission), “Shutdown” (if the user has permission), “Cancel” (to exit the choice menu), “Lock” (which returns to a login menu), and “Suspend” (press the system’s power button to login and resume operation).
6.9.3. Lumina Configuration Utility
The Lumina Configuration utility, shown in Figure 6.9c, allows the user to configure every aspect of the desktop and is the recommended way to make changes. To launch this utility, click the “User” icon then Desktop Preferences ‣ Desktop Appearance/Plugins or, right-click the desktop and click Settings ‣ Desktop, or type lumina-config from an xterm.
Figure 6.9c: Lumina Desktop Configuration
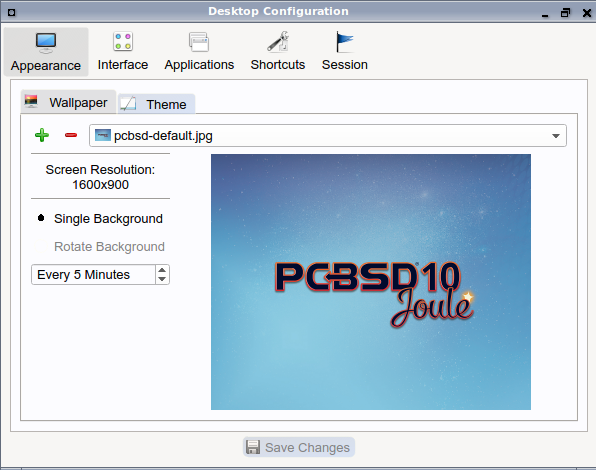
Each of the tabs at the top configures a different area of the system, with the most frequently changed options on the left side. Once changes have been made, the “Save Changes” button at the bottom of the window will become active. This allows the user to setup multiple changes in any tab and apply them all at the same time.
Note
if you make any changes in any of the tabs, click “Save Changes” before exiting this utility in order to save them.
The following tabs are available:
Appearance: this tab is used to change the visual appearance and functionality of the desktop on a per-screen basis. The “Wallpaper” tab can be used to add (“+” button) or remove (“-” button) the image(s) to use for the desktop’s wallpaper. By default, when you click the “+” button, the Lumina backgrounds stored in /usr/local/share/wallpapers/Lumina-DE/ are displayed. Click the drop-down “Look In:” menu to select an alternate wallpaper location. If multiple images are selected, the “Rotate Background” button can be selected as well as a specified time interval in minutes to rotate to the next image.
Click the “Theme” tab to change the default font, font size, theme template, color scheme, and icon pack. It is possible to create your own theme template or color scheme by clicking the “Edit” button next to those options and changing the settings as necessary. Note that the theme templates are written as Qt stylesheets, so some scripting experience may be helpful when configuring a theme. After making your changes, you can either click the “Save” button to save the theme without closing the editor, or click the “Apply” button which will both save the theme and close the theme editor.
Interface: the “Interface” tab is used to configure the desktop menu and panels. Its “Desktop” tab, shown in Figure 6.9d, is used to configure which items appear in the right-click menu.
Figure 6.9d: Right-Click Menu Configuration
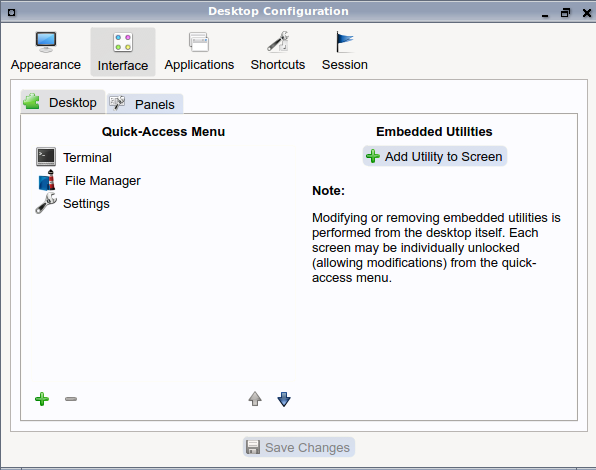
To add an item to the right-click menu, click the “+” button. This will open the “Select Plugin” where you can add an application, custom app, an entry for the File Manager, a separator, a shortcut to Settings, a terminal, or a listing of currently open applications. Alternately, click “Add Utility to Screen” and select which application to add. To remove an item from the right-click menu, highlight it and click the “-” button. Use the arrow buttons to change the order of the items in the right-click menu.
Click the “Panels” tab to see the screen shown in Figure 6.9e.
Figure 6.9e: Panel Configuration
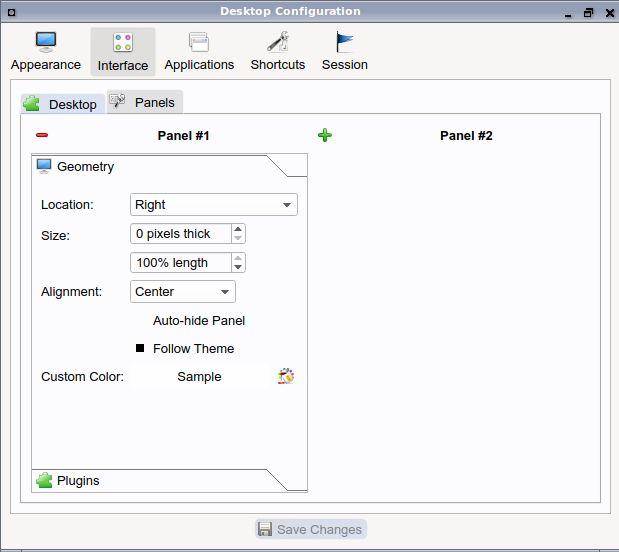
This screen can be used to customize the location, size, alignment, and theme of an existing panel and to add (“+”) or delete (“-”) additional panels. Panels must be aligned along a screen edge, opposite screen edges in the case of two panels, and may have any width, color, or transparency. Use the “Location” drop-down menu to set the location of the panel which can be “Top”, “Bottom”, “Left”, or “Right”. The “Size” can be used to specify the panel width in pixels and the length as a percentage. The “Alignment” drop-down menu can be used to center the panel on the edge or pin it to one of the corners. If you would like the panel to be hidden unless the mouse is hovered over it, check the box “Auto-hide Panel”. Use the “Custom Color” option to fine-tune the panel color.
Once a panel’s appearance has been configured, plugins can be added by clicking “Plugins” then the “+” button and selecting a plugin from the list that appears. Similarly, clicking the “-” button will remove the selected plugin, and the arrow buttons can be used to move the location of the plugin on the panel. The top of the list corresponds to either the top of a vertical panel or the left side of a horizontal panel. Some of the available plugins include:
- Application Launcher: when you select this plugin, it will prompt you to select the application to launch. This will add a shortcut for launching the selected application to the panel.
- Battery Monitor: hover over this icon to view the current charge status of the battery. When the charge reaches 15% or below, the low battery icon will flash intermittently and will change to a low battery icon when there is less than 5% charge left.
- Desktop Bar: adds a “star” button for automatically displaying entries for anything in the ~/Desktop folder and alternately launching the selected entry.
- Start Menu: adds a classic start menu as seen on other operating systems.
- Home Button: this button will hide all open windows so that only the desktop is visible. This is useful for touch screens or small devices.
- Task Manager: is added by default. Its behavior is to group windows by application.
- Task Manager (No Groups): ensures that every window gets its own button. This uses a lot more space on the panel since it needs to put part of the window title on each button.
Note
each Lumina plugin automatically contains a unique settings file in ~/.lumina/desktop-plugins/<plugin_name>---<screen number>.<pluginnumber>.conf, which contains its location and sizing information as well as providing the possibility for each plugin to store its own customized settings as necessary.
Applications: the “Applications” tab, shown in Figure 6.9f, is used to configure which applications start when you login to Lumina as well as the default applications and file types.
Figure 6.9f: Lumina Applications Configuration
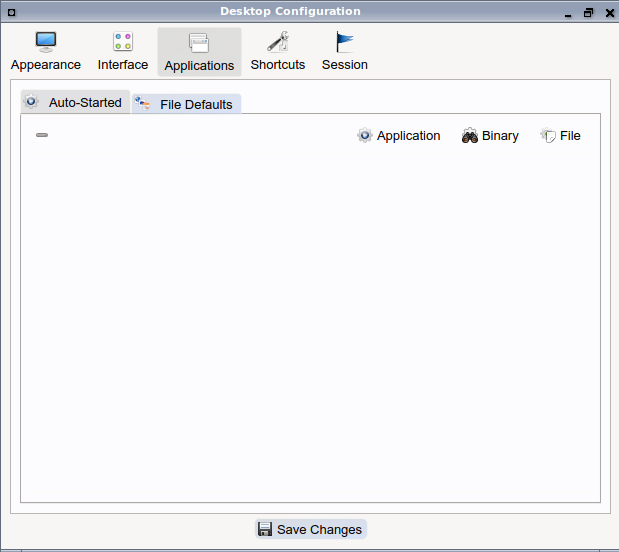
To configure auto-start, click the “Application” menu to select the application’s name from a drop-down menu or the “Binary” or “File” icon to browse to the location of the application or file to open. If you select a file name, Lumina will automatically open it in an application that is capable of reading the file type.
To configure the default applications and file types, click the “File Defaults” tab. In the screen shown in Figure 6.9g, you can configure the default web browser, email client, file manager, and virtual terminal. Either click “Click to Set” or the name of the existing application to select from a menu of available applications. If you wish to restore the default application, click the current application’s name, then click “Restore Defaults”.
Figure 6.9g: Lumina Defaults Configuration
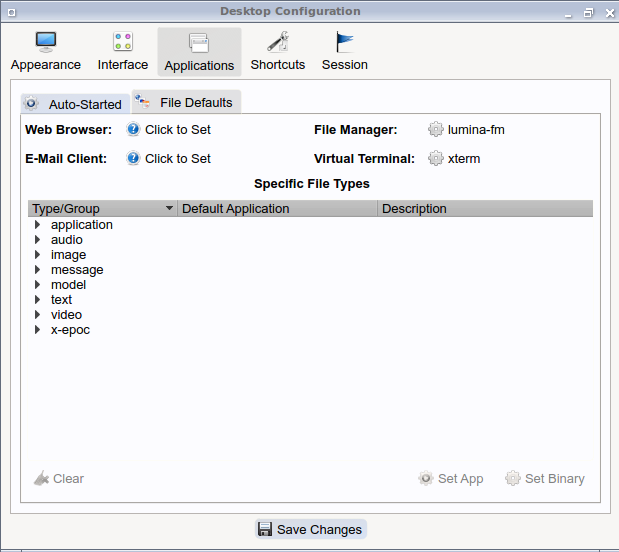
This screen can also be used to set the default application for several categories of file types. To add an application, select the file type and either click “Set App”, which will open a drop-down menu of common applications, or “Set Binary”, which will open a file browser so that you can browse to the path of the application.
Note
some applications, such as web browsers, keep their own internal lists of default applications for opening particular types of files. If you set that application to use the lumina-open or xdg-open utilities, it will use the default applications that are set here instead so that there is only a single list of default applications for the system.
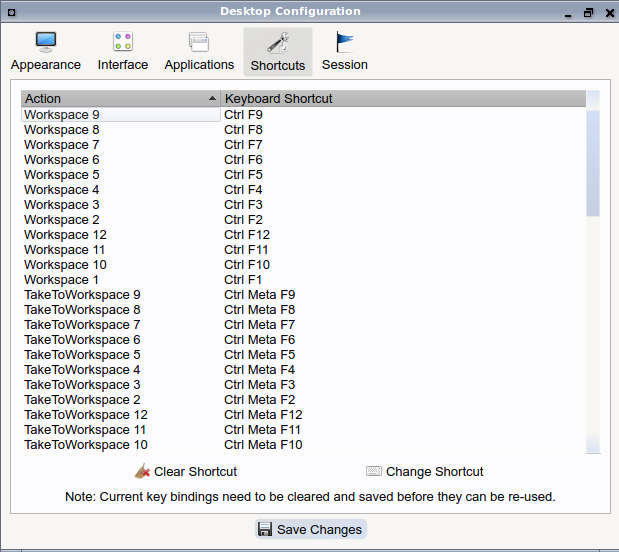
Shortcuts: the “Shortcuts” tab, shown in Figure 6.9h, is used to configure various keyboard shortcuts for system or window tasks. Most of these options relate to window and workspace management, such as moving windows between workspaces, but there are also options for changing the system audio volume or screen brightness. Note that a shortcut that is already in use can not be assigned to another action. First, that shortcut needs to be cleared and saved, before that key press will be detectable when creating or changing a shortcut.
Figure 6.9h: Lumina Shortcuts Configuration
Session: the “Session” tab, shown in Figure 6.9i, governs the general settings for the desktop session. These settings are usually not changed on a frequent basis.
Figure 6.9i: Lumina Session Configuration
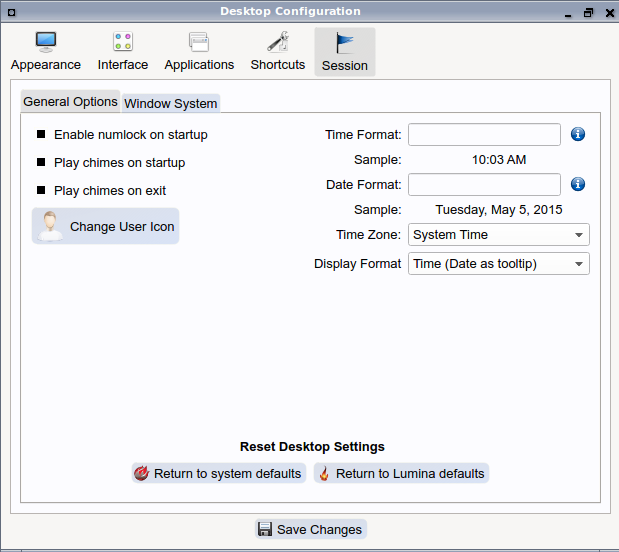
The “General Options” tab contains the following options: “Enable numlock on startup”, “Play chimes on startup”, and “Play chimes on exit”. It can also be used to change the user’s icon which appears in the login menu and to set the time format, date format, and time zone. It can also be used to reset the desktop settings to either system defaults or Lumina defaults.
The “Window System” tab allows the user to setup various configuration options for the window manager. These options include the number of workspaces, where new windows are placed on the screen, when windows receive focus, and the appearance of the frame around application windows.
6.9.4. Lumina Screenshot
This utility can be used to take screenshots of the desktop or applications and save them as PNG image files. To launch this utility, click the icon for System Applications ‣ Lumina Screenshot or type lumina-screenshot from an xterm.
To take a screenshot, click the “Snap” button in the upper-right corner of the screen shown in Figure 6.9j.
Figure 6.9j: Lumina Screenshot
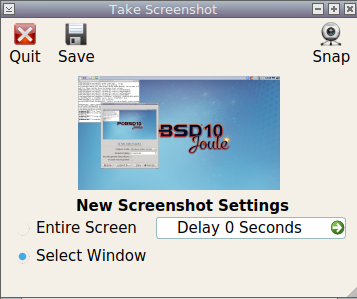
The settings at the bottom of the window can be used to select the “Entire Screen” or to “Select Window”. The delay, in number of seconds, can also be configured in order to give time to setup the screenshot. If you like the look of the taken screenshot, as shown in the preview, click the “Save” button to open a window where you can specify the name and location of the saved screenshot.
Note
the “Print Screen” keyboard shortcut is set to run this utility by default.
6.9.5. Insight File Manager
The Insight file manager, shown in Figure 6.9k, allows the user to easily browse and modify files on the local system on a per-directory basis. To open Insight, right-click the desktop and select “Browse System” or type lumina-fm from an xterm.
Figure 6.9k: Insight File Manager
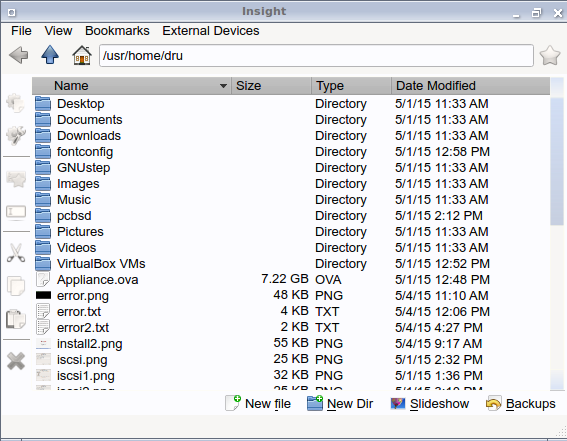
It is possible to open up additional directories through the tab system using Ctrl-T or click File ‣ New Tab, allowing the user to easily manage multiple locations on the system. Insight also features the ability to “bookmark” locations on the system for instant access via the “star” button. Once a location has been bookmarked, it will be available via the “Bookmarks” menu at the top of the window. Any removable devices that are available on the system will show up in the “External Devices” menu, if supported by the operating system. When an item is selected, the options on the left side of the screen will show the possible actions that may be taken with regards to that item. Possible actions include: “open”, “open with” (will prompt for the application to use), “add to favorites”, “rename”, “cut”, “copy”, “paste”, and “delete”. By default, the actions buttons are visible. They can be made invisible by clicking View ‣ Show Action Buttons. To disable thumbnails, uncheck :menuselection:`View –> Load Thumbnails. Note that this option does not retroactively remove thumbnails that have already been loaded, it only prevents loading thumbnails in new directories. Hidden files are not shown by default; this can be changed by checking :menuselection:`View –> Show Hidden Files.
If you select a file or directory and right-click it, the following options become available: “Open”, “Open With” (where you select the application to use), “Rename”, “View Checksums” (shows the MD5 checksum), “Cut Selection”, “Copy Selection”, “Paste”, “Delete Selection”, or “File Properties” (such as file type, size, permissions, and creation date).
A few additional options may be available at the bottom of the window, depending on the directory being viewed and the types of files that are in it:
- New file: the ability to create a new file is available if the user has permission to modify the contents of the current directory.
- New Dir: the ability to create a new directory is available if the user has permission to modify the contents of the current directory.
- Slideshow: if there are image files in the directory, this option will display those image files as a slideshow and provide arrows for going forward or back by one file or to the very beginning or end of the file list. Buttons are also provided for deleting the currently displayed image or to rotate it, and save the rotation, clockwise or counter-clockwise.
- Play: will appear if there are supported multimedia files in the directory. The types of files that are supported depends on what multimedia plugins are installed on the system. If a particular file is not recognized as a multimedia file, install the associated multimedia codec using the operating system’s application management software and restart the file manager.
- Backups: if the system is formatted with ZFS and snapshots of the current directory are available, this button will appear. Snapshots are organized from oldest to newest, with the most recent snapshot selected by default, and the contents of the directory at the time of that snapshot are displayed. To restore a file or multiple files, select them from the list and click the “Restore Selection” button. If those files still exist and you want to overwrite them, make sure the “Overwrite Existing Files” option is checked first. Otherwise, if a file with that name exists, the restore will append a number to the end of the filename. For example, the first restored version of testfile.txt will become testfile-1.txt.
6.9.6. Lumina Open
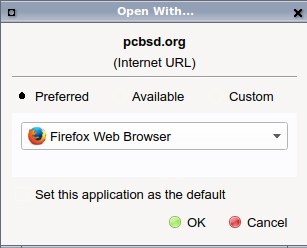
To open a file, directory, or URL from the command line, use lumina-open followed by the full path to the file or the URL. This utility will look for an appropriate application to use to open the specified file or URL. If there is no default application registered for the input type, a small dialog will prompt the user to select which application to use, and optionally set it as the default application for this file type. As seen in Figure 6.9l, this dialog organizes the available applications into three types:
- Preferred: these applications have registered their Mime type with the system and can open that type of file. Also included are any applications that have been used to open this type of file before as it keeps track of the last three applications used for that file type.
- Available: displays all the applications installed on the system, organized by category and name.
- Custom: lets the user manually type in the binary name or path of the application to use. It also provides a small button to let the user graphically search the system for the binary. Whenever text is entered, a check is performed to determine whether that is a valid binary and the icon will change between a green checkmark or a red X as appropriate.
Figure 6.9l: Lumina Open
6.9.7. Lumina Search
The lumina-search utility provides the ability to easily search for and launch applications or to quickly search for file and directories. The “*” wildcard can be used in the search terms and the search will include hidden files if the search term starts with a dot (”.”). Figure 6.9m shows a screenshot of this utility.
Figure 6.9m: Lumina Search
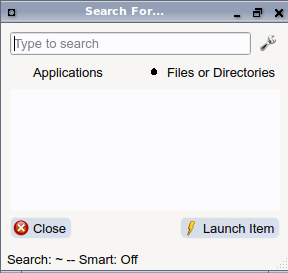
By default, a “Files or Directories” search is limited to the user’s home directory, as indicated by the “Search: ~” at the bottom of the screen. The “Smart: Off” indicates that every subdirectory is included in the search; in other words, there are no excluded directories. To add additional search directories or to exclude subdirectories, click the wrench icon to see the screen shown in Figure 6.9n.
Figure 6.9n: Configuring the Search Directories
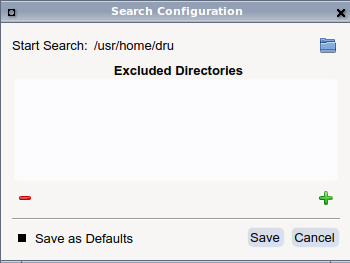
Click the blue folder icon to change the starting search directory. For example, you can select “Computer” then “/” from the “Select Search Directory” screen to search the entire contents of the computer. You can also add directories to exclude from searches by clicking the “+” button. If you add any excludes, you can delete an exclude by highlighting it and clicking the “-” button. By default, the “Save as Defaults” option is selected. Unselect this option if you only wish to temporarily modify your search settings.
6.9.8. Lumina Xconfig
The lumina-xconfig utility is a graphical front-end to the xrandr command line utility. It provides the ability to probe and manage any number of attached monitors. To start this utility, right-click the desktop and select Settings ‣ Screen Configuration, click the “User” icon then Desktop Preferences ‣ Screen Configuration, or type lumina-xconfig from an xterm. This will open a screen similar to the one shown in Figure 6.9o.
Figure 6.9o: Configuring Monitors
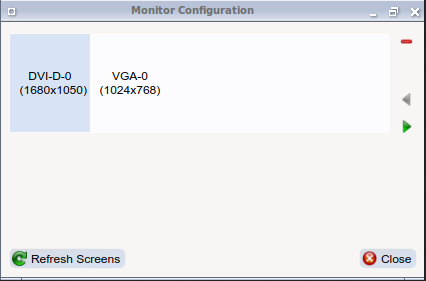
In this example, two monitors are attached to the system and each is displayed along with their current screen resolution.
6.10. LXDE
The Lightweight X11 Desktop Environment is an excellent choice for older hardware or for users who want a complete desktop environment without all of the overhead required by KDE or GNOME. Since it is XDG-compliant, the PC-BSD® Control Panel, AppCafe®, and Life Preserver are available on the desktop and integrated into LXDE’s menus.
Figure 6.10a shows a screenshot of the default LXDE installation with the LXPanel open.
Figure 6.10a: LXDE Desktop on a PC-BSD® System
In addition to the PC-BSD® utilities, LXDE provides the following utilities:
- LXPanel: desktop panel which is launched by clicking on the PC-BSD® icon in the lower right corner of the desktop. To configure the panel, right-click the PC-BSD® icon and select “Panel Settings” or “Add/Remove Panel Items” from the right-click menu.
- PCManFM: found in System Tools ‣ File Manager PCManFM. A file manager with features like drag and drop, tabbed browsing, built-in file search, file association with default application, thumbnails for images, bookmarks, and support for non-UTF-8 encoded filenames.
- GPicView: fast image viewer found in Accessories ‣ Image Viewer.
- Leafpad: a light-weight graphical text editor found in Accessories ‣ Leafpad.
- LXTerminal: terminal emulator found in Accessories ‣ LXTerminal
- Xarchiver: archiver utility that supports the 7z, ARJ, bzip2, gzip, lzma, RAR, RPM, DEB, tar, and ZIP file formats. Found in Accessories ‣ Xarchiver.
- epdfview: a PDF viewer with printing support found in Office ‣ Document Viewer.
- LXTask: task manager and system monitor found in System Tools ‣ Task Manager.
- LXAppearance: a theme switcher for customizing the widgets, colors, icons, mouse cursors, and sound effects used by applications. Found in Preferences ‣ Customize Look and Feel.
- LXInput: a tool to configure your keyboard and mouse found in Preferences ‣ Keyboard and Mouse.
- Openbox: the window manager used by LXDE. You can configure settings such as themes, appearance, mouse, and margins by going to Preferences ‣ Openbox Configuration Manager.
6.11. MATE
The MATE desktop is a fork of the popular, but now unmaintained, GNOME2 desktop environment. MATE is under active development to add support for new technologies while preserving the traditional GNOME desktop experience and its many built-in utilities. Figure 6.11a shows a screenshot of MATE on a PC-BSD® 10.1.2 system with the “Applications” menu open.
Figure 6.11a: MATE Desktop on a PC-BSD® System
Each category in the “Applications” menu contains many applications and the System ‣ Preferences category contains many utilities for configuring your system. If you are new to MATE, take some time to discover which applications best suit your needs. Some of the applications which are provided by MATE include:
- Engrampa: archive manager found in Accessories ‣ Engrampa Archive Manager.
- Pluma: text editor found in Accessories ‣ pluma Text Editor.
- Atril: PDF document viewer found in Office ‣ Atril Document Viewer.
- Caja: file manager found in System Tools ‣ Caja. It is a fork of Nautilus.
You can find additional themes and wallpapers at gnome-look.org.
6.12. Openbox
This minimalist window manager is highly configurable. It is the window manager used by LXDE but can also be run separately from LXDE.
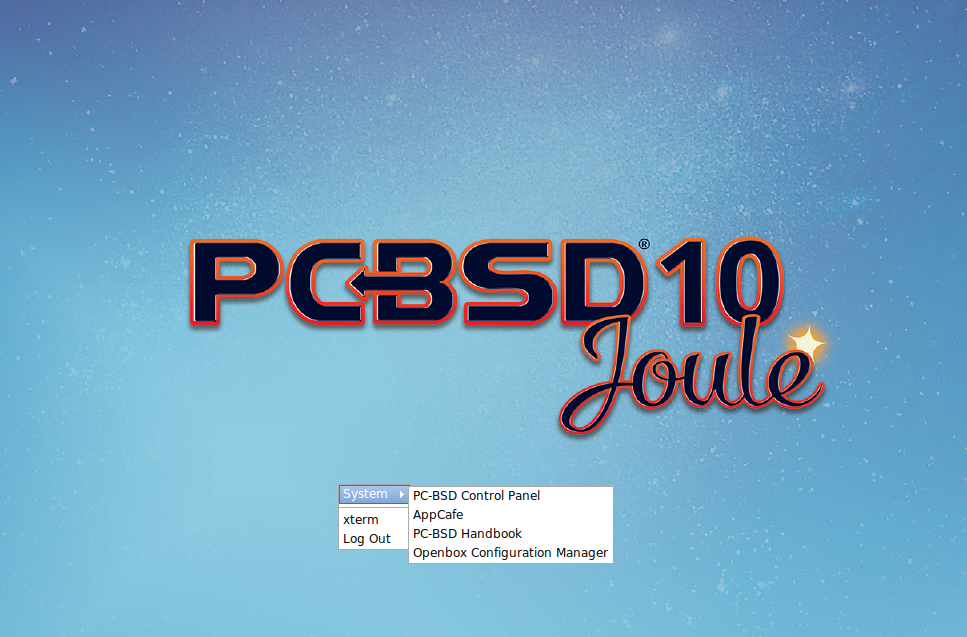
Figure 6.12a provides a screenshot of Openbox running on a PC-BSD® system. The application menu was launched by right-clicking on an area of the desktop.
Figure 6.12a: Openbox on a PC-BSD® System
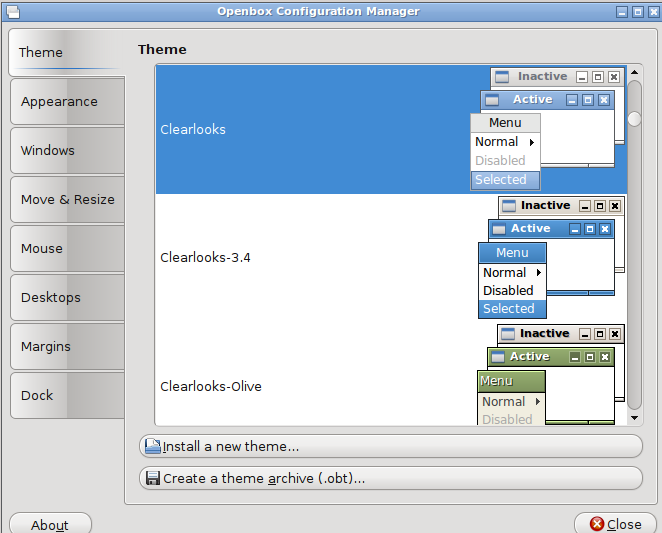
The application menu contains an entry for the Openbox Configuration Manager which can be used to customize settings such as themes, appearance, mouse, and margins. A screenshot of this configuration utility is shown in Figure 6.12b.
Figure 6.12b: Openbox Configuration Manager
A list of websites containing additional themes is available from the Openbox wiki.
6.13. Ratpoison
The simple Ratpoison window manager has no fat library dependencies, fancy graphics, nor window decorations.
Figure 6.13a provides a screenshot of Ratpoison running on a PC-BSD® system:
Figure 6.13a: Ratpoison on a PC-BSD® System

Ratpoison uses keyboard shortcuts. To view the shortcuts, press Ctrl-t then ?. To leave this help screen, press Enter.
To open an xterm, press Ctrl-t then c. Type exit to close the xterm. Type killall ratpoison within an xterm to leave Ratpoison and return to the login screen.
The Ratpoison wiki contains an FAQ and tips for setting keyboard shortcuts.
6.14. spectrwm
The spectrwm minimalist window manager, formerly known as scrotwm, is written by OpenBSD hackers. It provides keyboard shortcuts, a configuration file, and assumes that the user prefers to use the command line. If you have not used spectrwm before, spend some time reading through its man page first.
To launch applications within spectrwm, start an xterm by pressing Alt+Shift+Enter. Once you have an xterm, you can start any program you wish. For example, to start Control Panel type pc-controlpanel. spectrwm does not provide minimize, maximize, or close buttons within its windows. To close a GUI application, use CTRL-c within the xterm you used to launch the application. To leave this desktop, type killall spectrwm from an xterm.
6.15. WindowLab
The WindowLab window manager is small and simple. It uses a window resizing mechanism that allows one or many edges of a window to be changed in one action, and an innovative menubar that shares the same part of the screen as the taskbar. It follows a click-to-focus but not raise-on-focus policy. This means that when a window is clicked it gets focus, but it is not redrawn to obscure other windows. This allows one, for example, to switch to a terminal to enter commands while keeping documentation visible in a web browser.
Use the right mouse button to display the top menu panel. Use the left mouse button or hover over a taskbar entry to open that application.
To add the applications you use most often to the menubar, select “Edit menu” while holding the right mouse button.
To leave the WindowLab session, select “Quit” from the menubar.
6.16. Window Maker
The Window Maker window manager is light-weight and designed to reproduce the look and feel of the NEXTSTEP user interface.
Figure 6.16a shows a screenshot of Window Maker running on PC-BSD®. In this example, the user launched the “Application” menu by right-clicking an area of the desktop.
Figure 6.16a: Window Maker on PC-BSD®
In addition to the PC-BSD® utilities, Window Maker provides the following applications:
- WPrefs: located in Appearance ‣ Preferences Utility. Allows you to configure window focus, window placement, menu alignment, icons, keyboard actions, mouse, fonts, and various other window manager settings.
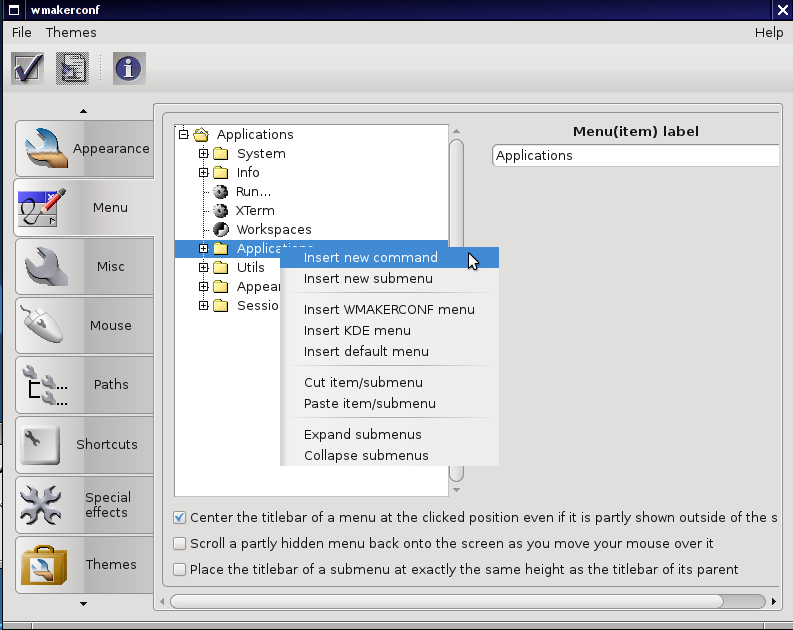
- wmakerconf: found in Utils ‣ wmakerconf. Allows you to fine-tune your menu entries as well as your desktop’s appearance, themes, background, mouse, and special effects. Figure 6.16b shows wmakerconf with the “Menu” button selected.
Figure 6.16b: Editing the Application Menu Using wmakerconf
6.16.1. Working with the Dock
Window Maker uses a dock to store application shortcuts. The dock appears as a series of icons in the upper right corner of the desktop. Docked applications always show on the desktop, even after you close an application or close and restart your Window Maker session.
Whenever you start an application, an icon will appear in the lower left corner of the screen. You can move that icon elsewhere on the desktop with your mouse. If you right-click the icon, you have the option to hide/unhide the icon, set icon (change its picture), or kill the application. If you drag the icon onto the dock, it will remain on the desktop.
Once an icon is docked, a settings menu is added to the icon’s right-click menu. Figure 6.16c demonstrates how to configure an icon for AppCafe®.
Figure 6.16c: Configuring an Icon
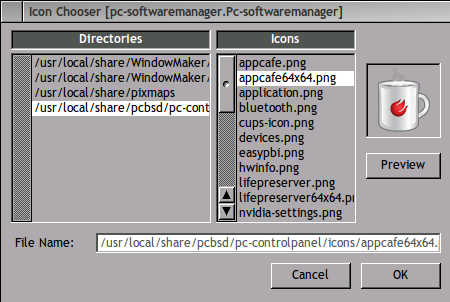
You will find the icons for AppCafe® and Control Panel in /usr/local/share/pcbsd/pc-controlpanel/icons. Choose the 64x64 versions as this is the size that Window Maker users. The application name for AppCafe® is appcafe and for Control Panel it is pc-controlpanel.
6.16.2. DockApps
Window Maker supports dockapps which are applications that were designed to work with Window Maker but which are separate from the Window Maker project. Dockapps tend to be small and designed to perform a particular function. For example, there are clocks, weather applications, and CPU monitors. Most dockapps have been ported to FreeBSD and the port name always begins with “wm”. You can search for these at freshports.org by entering a “Short Description” containing “dockapp”.
If your favorite dockapp has not been ported to FreeBSD, you can request that a port be created on the Ports Requests forum using these instructions.
6.17. XFCE4
XFCE is a lightweight desktop environment that aims to be low on system resources and fast, while still being visually appealing and user friendly. More information about XFCE, including usage tips, can be found at the XFCE FAQ.
The first time you start XFCE4, you will see the message shown in Figure 6.17a.
Figure 6.17a: Panel Welcome Message
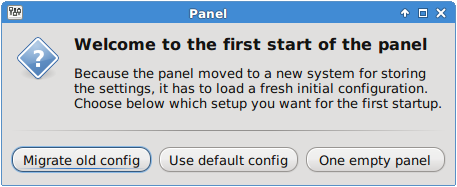
In XFCE, a panel is a bar which can hold many items such as application launchers, window lists, a clock, a notification area, and application menus. Your initial panel setup options are:
- Migrate old config: select this option if you wish to have a single panel with an application launcher and other icons as shown in Figure 6.17b. The application launcher menu may be accessed by the fireball icon in the lower left, or by right-clicking the desktop.
- Use default config: this option will install a small, minimal panel centered on the bottom. The application launcher menu may be accessed by the fireball icon in the top bar, or by a right-click on the desktop.
- One empty panel: this option will install a panel with no icons. The application menu is available by right-clicking the desktop.
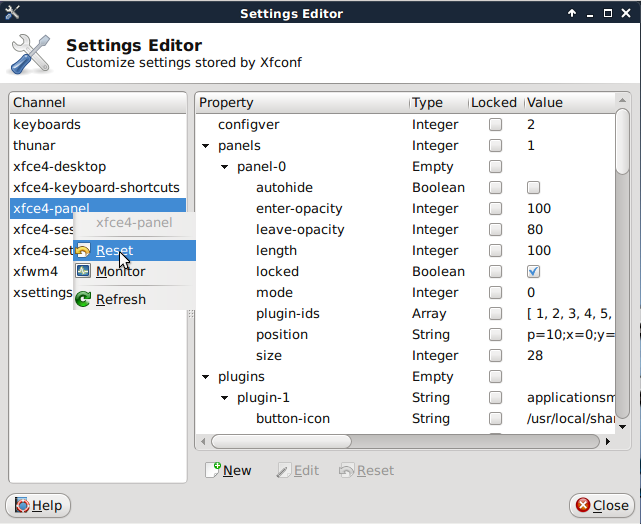
If you wish to change your configuration choice at a later time, reset the panel using Applications ‣ Settings ‣ Settings Editor, shown in Figure 6.17d. Right-click the entry for “xfce4-panel” and click “Reset Channel”.
Figure 6.17b: XFCE with Complete Panel Migrated From Old Config
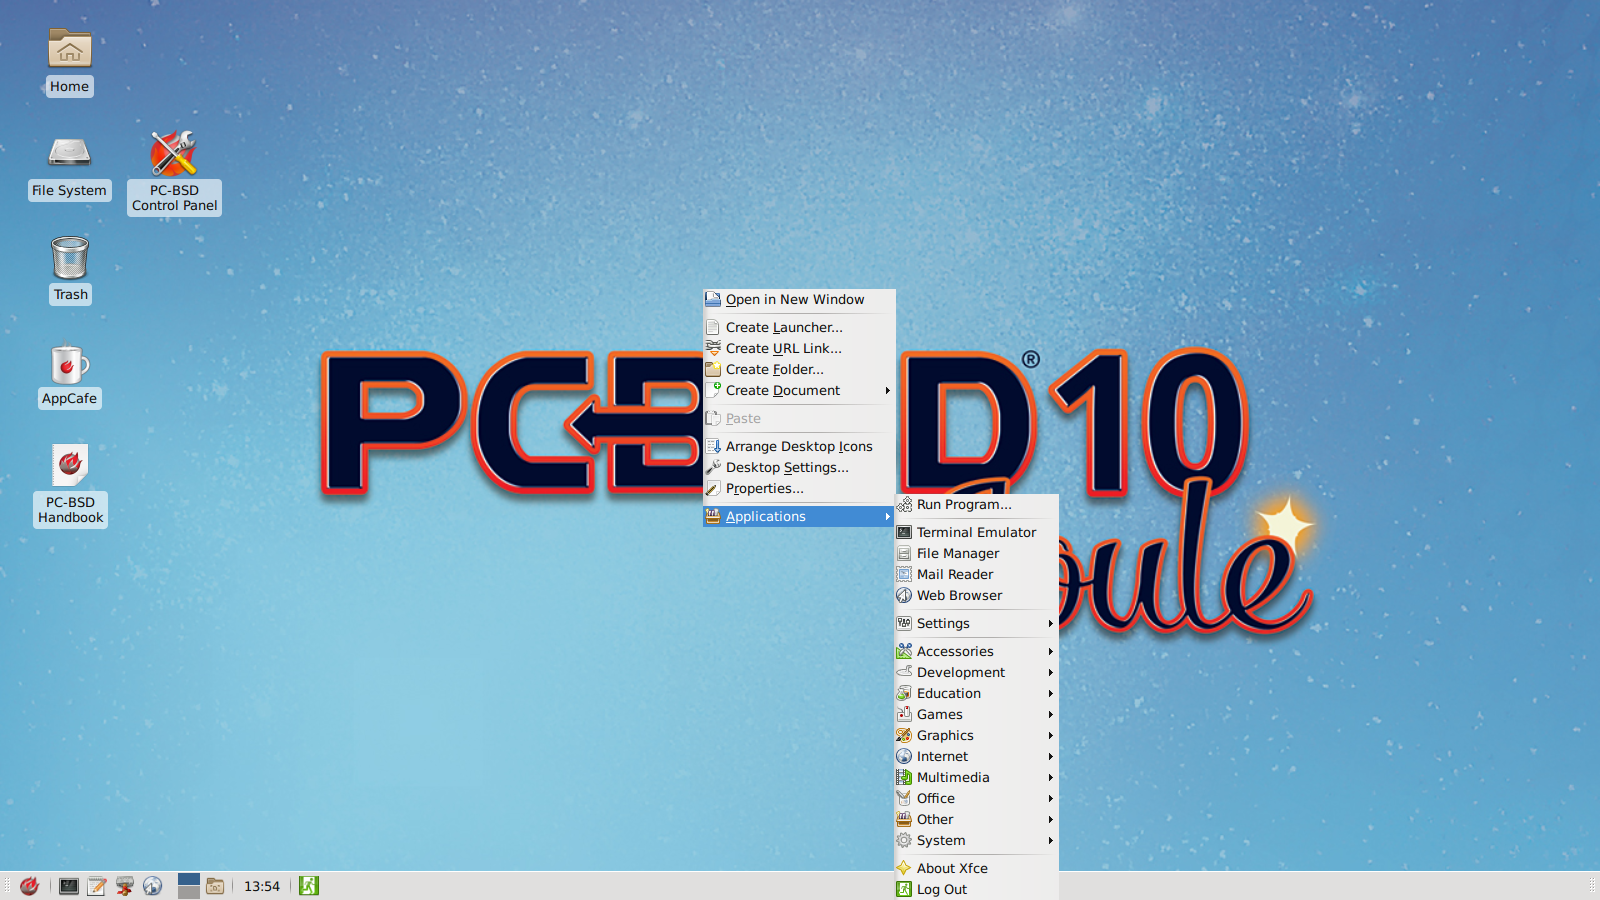
Figure 6.17c: XFCE with Minimal Panel Using Default Config
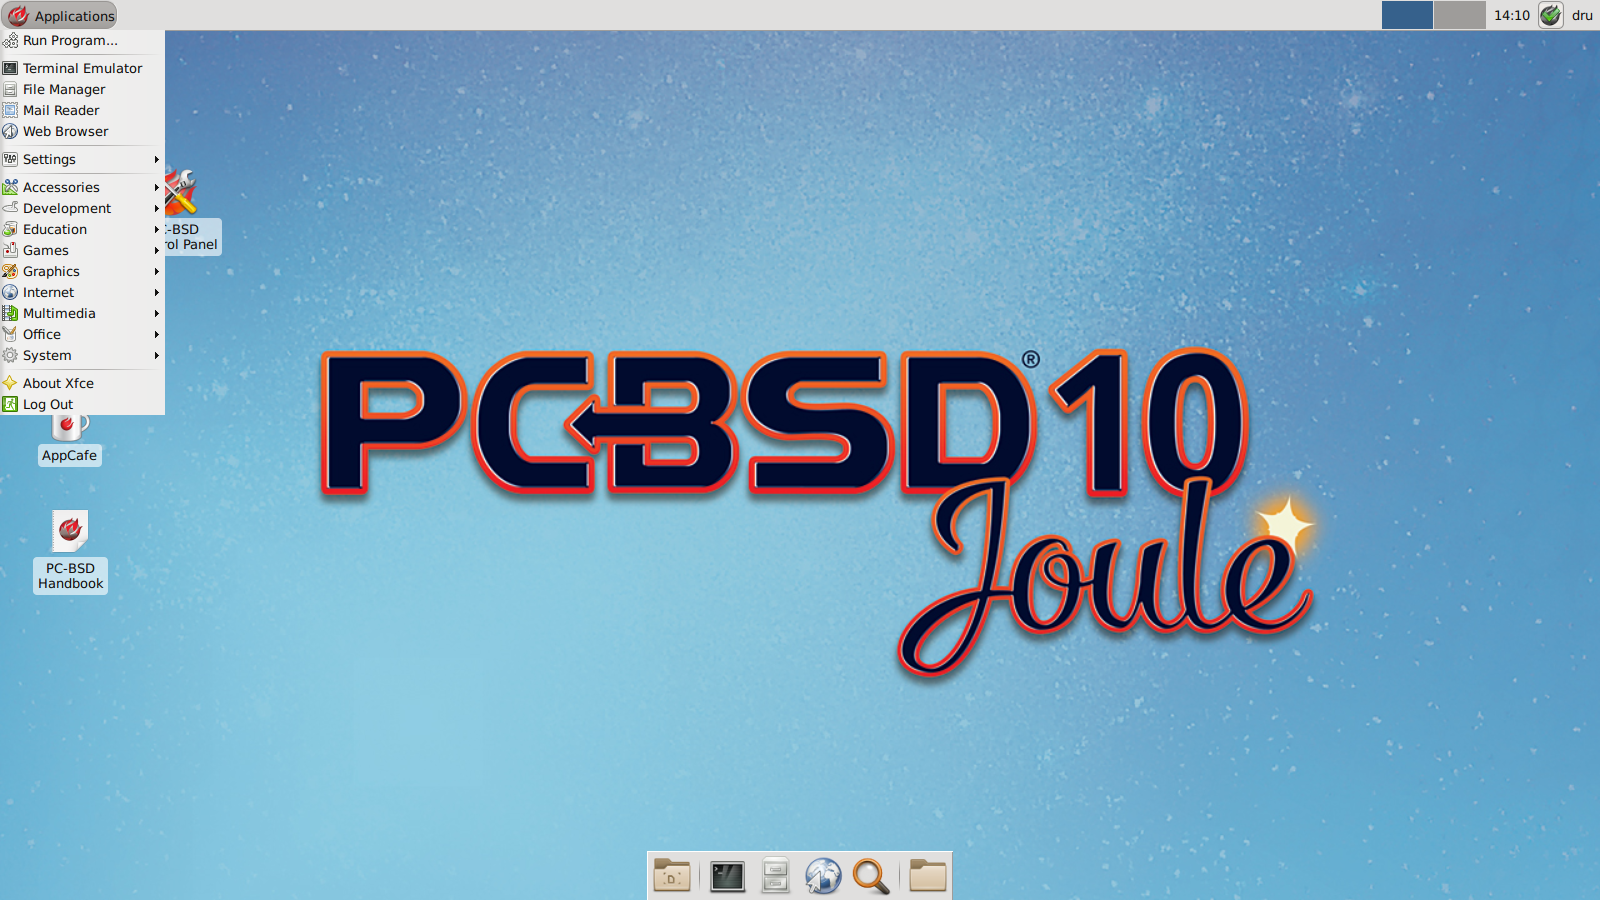
Figure 6.17d: Using Settings Editor to Reset Panel
In addition to the PC-BSD® utilities, XFCE provides the following utilities:
- Xfdesktop: desktop manager found in Settings ‣ Desktop. Sets the background image, provides a right-click menu to launch applications, and can show files (including application launchers) or iconified windows.
- Xfwm4: window manager found in Settings ‣ Window Manager. It provides window decorations, virtual desktops, multiscreen mode, transparency and a keyboard shortcuts editor.
- Ristretto: fast and light-weight picture viewer found in Graphics ‣ Ristretto Image Viewer.
- Midori: light-weight graphical browser found in Internet ‣ Midori.
- Xfburn: CD/DVD burning tool found in Multimedia ‣ Xfburn.
- Orage: calendar and reminder daemon found in Office ‣ Orage Calendar.
- Thunar: file manager found in System ‣ Thunar File Manager.
A list of recommended applications for XFCE can be found on the XFCE wiki.
6.17.1. XFCE Plugins
XFCE supports many plugins which provide additional applications that are separate from the official XFCE distribution. You can browse for plugins and read descriptions for each at the XFCE goodies website.
After installing a plugin, go to Settings ‣ Panel ‣ Items and click the “+” button in the right column to see the “Add New Items” screen shown in Figure 6.17e.
Figure 6.17e: Adding a Plugin to the Panel
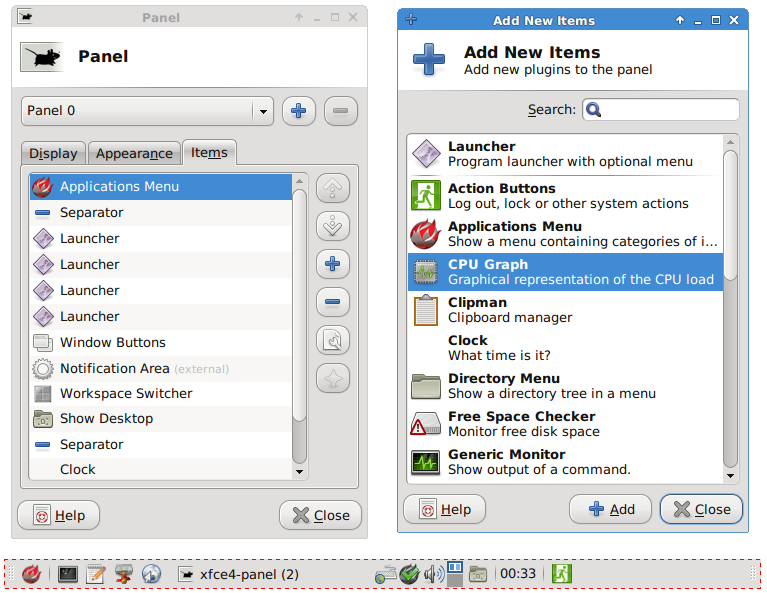
Select your new plugin from the list, and click the “+Add” button. It will immediately be added as an icon in the panel.

Table Of Contents
- 6. Desktops
Previous topic
5. Advanced Installation Topics
Next topic
7. Installing Applications and Keeping PC-BSD® Updated