Reading and Composing Mail in Messenger
Once you have configured your accounts in Communicator, you can begin using Messenger to send and receive email and newsgroup postings (turn to the section called Using Messenger to Read News to learn how to set up your news preferences).
There are two ways to start Messenger:
Open Netscape, and press
[Alt] -[2] From the Component Bar — and select the mail icon, which looks like:

The Netscape Mail & Newsgroups dialog which opens will look like Figure 7-12.
To compose email, go to the Toolbar and click on
the New Msg icon: ![]()
You can also create email by right-clicking on the
Inbox and selecting New
Message from the menu. Or use your
 | Creating Plaintext Messages |
|---|---|
If you set your preferences to create email and newsgroup documents in
HTML format, press the Alternatively, you can use press |
The Compose dialog will look like Figure 7-13.
Note that the title bar, at the top of the Compose dialog, will show the subject of your letter (as in Compose: Type in your subject here in Figure 7-13) once you save your message by clicking on the Save icon on the Toolbar.
In the address field, you can specify the following options:
To: The primary recipient(s) of your letter
Cc: To send a carbon copy to one or more recipients
Bcc: To send blind carbon copies to recipients whose identity you want to remain private
Reply-To: For specifying an email address to which you want replies sent
Newsgroup: To send your message to a newsgroup
Followup-To: To specify an email address you want to use for any posts to newsgroups
In the address field, enter the email address of your intended
recipient, then press
When you're finished typing in your addresses, press the
Now, type the body of your letter. When you're finished, click on the Send icon on the Toolbar to send your email.
Other Email Options
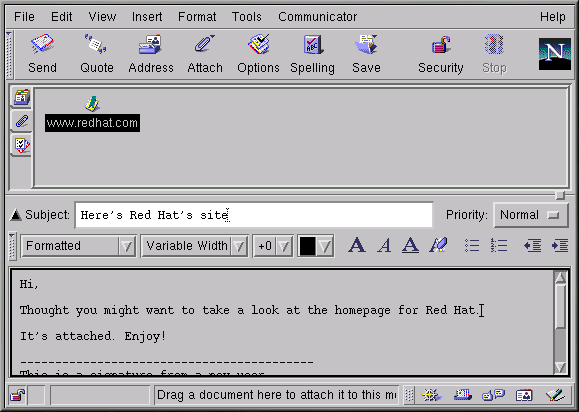
If you want to send someone a Web page or a file on your computer, you can attach the document to your message. Click on one of the paperclip icons, either on the Toolbar or on the tab beneath the address field.
When you have finished typing in the URL, click on the Attach button. In your letter, you'll see that the URL has been included with your letter (see Figure 7-15).
When you send your letter, the page associated with the URL will be sent with your letter.
 | Drag and Drop Web Pages |
|---|---|
You can also drag a URL from Navigator's
Location Toolbar and drop it in your letter. In
your letter, click on the paperclip icon under the address
field. Now, from Navigator, go to the
Location Toolbar and hold down your mouse
button over the nearby bookmark icon, which looks like this: Now, drag the icon to the attachments field of your letter. |
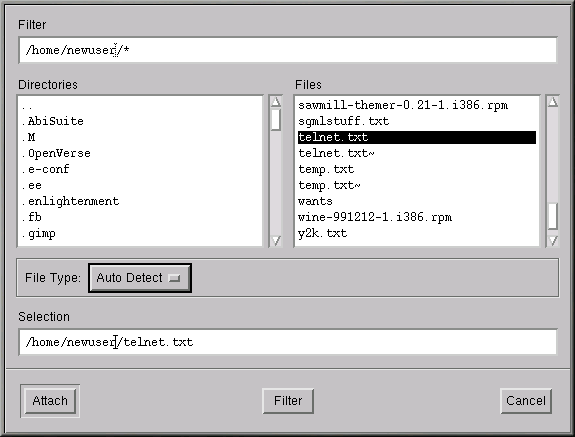
In the same way that you attach Web pages to your letter, you can attach files on your computer. When you select Attach from the Toolbar or beneath the address field, choose File from the menu. The Attach File dialog will open, showing you the contents of your login directory (see Figure 7-16).
 | Drag and Drop Files |
|---|---|
You can drag files from your desktop or from your file manager in the same way that you can drag URLs from Navigator. Just hold your mouse button over the file you want to attach, and drag it to the attachments field of your letter. |
Messenger can let you know if your email was actually read, or even received. You can request a return receipt to confirm that your mail arrived and was opened. Return receipts may not work, depending upon the configuration of the mail server on the recipient's end.
Messenger supports two kinds of return receipts:
Delivery receipts — notify you that your mail was delivered to the inbox of your intended recipient on their mail server
Read receipts — notify you that the recipient has opened your message
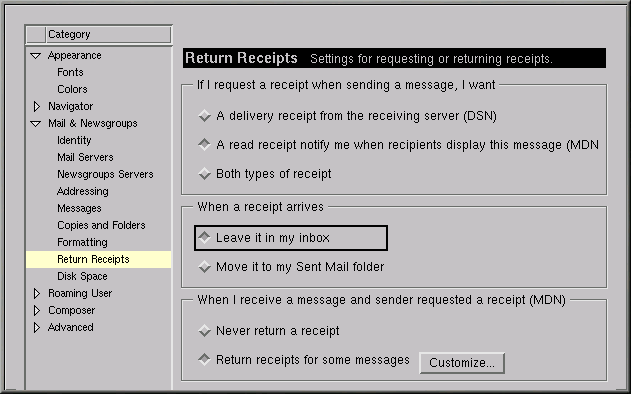
To specify preferences for return receipts, go to Edit => Preferences => Mail & Newsgroups => Return Receipts. In the dialog which opens (see Figure 7-17), choose how you want to use return receipts for mail you send and mail you receive.
To activate receipt notification, in your message go to View => Options and check Request return receipt. You can also click on the options tab beneath the attachments tab, or click on the Options menu on the Toolbar.
For more information about email options, such as address books, filtering email, and more, refer to Netscape Communicator's documentation, in the Help menu.


